Spread the love

Your hands are your ultimate daily accessory, and in 2026, the canvas of your fingertips has never been more expressive, creative, or deliciously detailed. Nail art has evolved far beyond a simple coat of polish; it is now an intimate extension of personal style, blending high-fashion sensibilities with cozy, everyday micro-trends. Whether you gravitate toward the quiet luxury of clean, minimalist glows or the playful whimsy of hyper-textured 3D charms, finding the right manicure can completely transform your mood, elevate your outfits, and boost your daily confidence.

The beauty of contemporary nail design lies in its incredible versatility. We are seeing a gorgeous fusion of nostalgic retro elements, futuristic metallic finishes, and soft, ethereal aesthetics that look straight out of a digital dreamscape. If you are ready to refresh your manicure routine, step away from the basic neutrals, and embrace designs that turn heads, you are in the right place.

Below is an exhaustive, deeply curated guide featuring twenty of the most aesthetic, amazing, gorgeous, and undeniably cute nail inspiration ideas for 2026. For each idea, you will discover the exact look, a step-by-step DIY guide on how to achieve it at home or communicate it to your nail technician, and creative variations to make the style uniquely yours.

1. Pastel Cloud French Tips

The Look: A dreamy twist on the classic French manicure, this style replaces stark white tips with soft, swirling pastel gradients that mimic cotton candy skies at dusk. Think lavender, baby blue, buttery yellow, and mint green melting into a milky translucent base. It feels whimsical, delicate, and effortlessly chic.

How to Make It:

  • Apply a strengthening base coat followed by two sheer layers of milky pink or nude gel polish to create a clean, healthy foundation.
  • Cure each layer under a UV/LED lamp.
  • Using a fine-line nail art brush or a silicone makeup sponge, gently dab or swipe pastel shades across the tips in soft, abstract arcs.
  • Blend the colors slightly where they meet to create a dreamy gradient cloud effect.
  • Seal your masterpiece with a high-shine glossy top coat and cure.

Tips and Variations:

  • Add tiny, minimalist silver star stickers along the smile line for an extra celestial touch.
  • Swap the milky base for a sheer holographic shimmer polish to catch the light from every angle.
2. Glazed Strawberry Milk Glam

The Look: Inspired by the viral chrome craze, this look features a luscious, milky pink base overlaid with an ultra-fine pearl chrome powder. It gives nails a translucent, glass-like finish that resembles sweet, fresh strawberry milk kissed by morning sunlight.

How to Make It:

  • Prep and dehydrate your nails, then apply a rubber base coat for added longevity.
  • Paint two thin coats of a sheer, milky strawberry-pink gel polish, curing between layers.
  • Apply a no-wipe gel top coat and cure for 30 seconds (it needs to be slightly tacky for the powder to adhere smoothly, depending on your specific powder type, or completely cured for a mirror-like buff).
  • Using an eyeshadow applicator or your fingertip, gently buff the white pearl chrome powder directly onto the surface until a uniform, high-shine glaze appears.
  • Dust away excess powder and seal everything with a second layer of top coat, capping the free edge securely.

Tips and Variations:

  • Try a lavender or peach pastel base underneath the chrome powder for a custom berry-sorbet hue.
  • Paint microscopic white hearts on the ring fingers for an extra dose of sweetness.

3. Matcha Latte Swirls

The Look: An earthy, grounding, and undeniably aesthetic choice, this design combines creamy off-white bases with fluid, organic ribbons of matcha green and warm caramel brown. It channels the comforting warmth of your favorite morning latte.

How to Make It:

  • Start with a clean, opaque nude or warm cream base color. Cure fully.
  • Mix a few drops of deep olive green gel polish with a touch of white to achieve that signature muted matcha shade.
  • Dip a fine liner brush into the matcha polish and draw fluid, asymmetrical lines curving from the cuticle to the tip.
  • Add a secondary thin line of warm caramel brown right beside the green to create depth.
  • Cure the design and finish with a glossy top coat.

Tips and Variations:

  • Opt for a matte top coat instead of glossy for a velvety, ceramic-like finish that feels ultra-modern.
  • Incorporate tiny flecks of gold leaf foil along the curved lines for a touch of luxury.

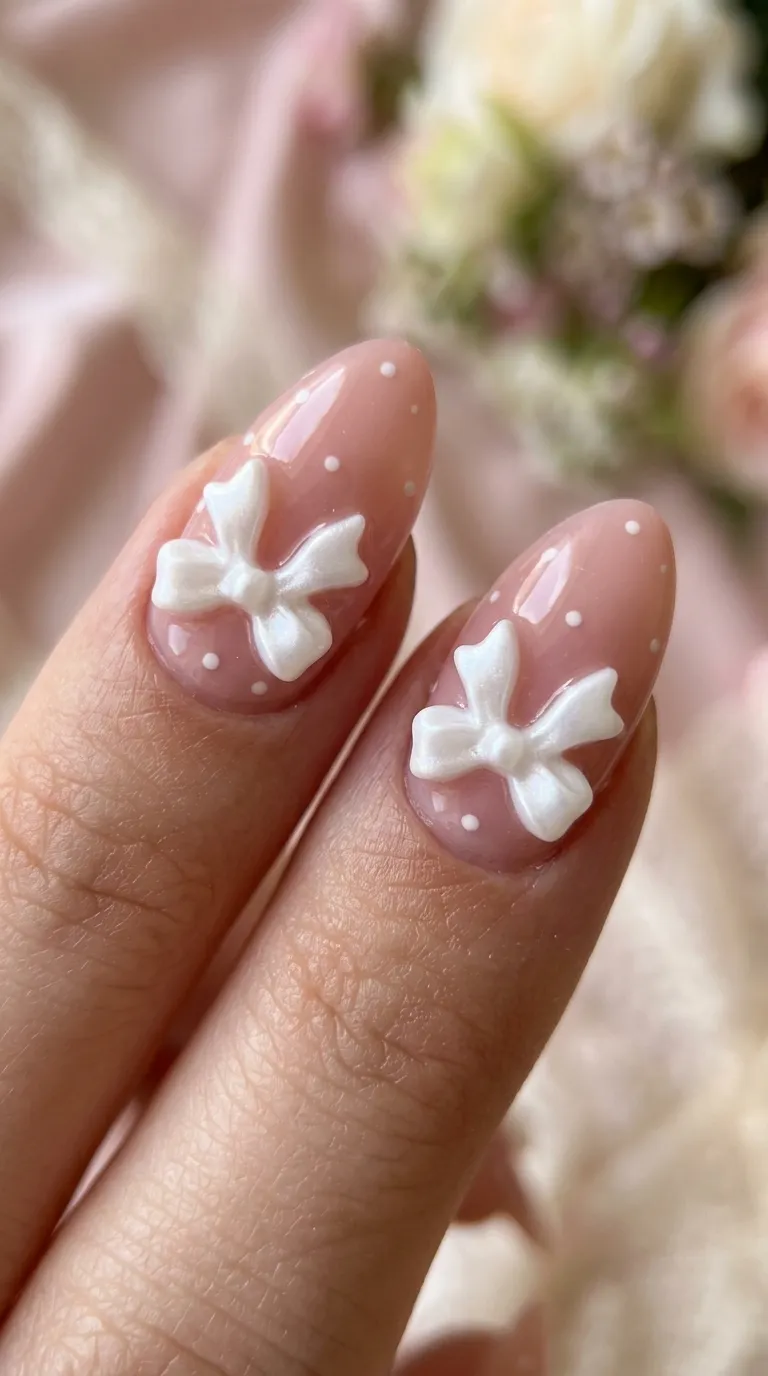
4. Coquette Bows and Ribbons

The Look: Embracing the hyper-feminine coquette aesthetic, this design features delicate, hand-painted or 3D-molded ribbon bows resting gracefully near the cuticles or tips. Paired with soft pinks and lace-like patterns, it is the epitome of cute and romantic.

How to Make It:

  • Paint your nails in a sheer, rosy pink or a clean, translucent base.
  • Using a thick white or cherry red gel liner, draw two small loops followed by two trailing ribbon tails to form a dainty bow. Alternatively, apply pre-made 3D acrylic or silicone bow charms using a dollop of builder gel.
  • Flash cure the charms or painted bows to lock them in place.
  • Surround the bows with tiny micro-dots or a delicate lace border if desired.
  • Lock the entire manicure in with a durable top coat.

Tips and Variations:

  • Use metallic silver gel for the bows to give a modern, edgy twist to a traditionally sweet design.
  • Try black velvet ribbons on a nude base for a more gothic, high-fashion coquette look.

5. Vintage Cherry Motif

The Look: Playful, retro, and utterly charming, bright red cherries dangling from slender green stems instantly add a pop of cheerful color to your hands. This look pairs wonderfully with square or oval nail shapes.

How to Make It:

  • Apply a neutral beige, pale pink, or milky white base polish to let the vibrant red cherries stand out.
  • Using a dotting tool dipped in bright cherry red gel, place two small dots close together to form the fruit.
  • Take a fine liner brush with dark brown or forest green polish to draw the stems curving upward into a shared knot.
  • Add a microscopic white crescent dot on each red cherry to create a realistic light reflection.
  • Cure and seal with a glossy top coat.

Tips and Variations:

  • Paint cherries on only one accent nail per hand while keeping the rest a solid, glossy red.
  • Create a checkerboard pattern on alternating nails for a bold, Y2K-inspired picnic vibe.

6. Aura Gradient Glow

The Look: Capturing the spiritual and mystical energy of aura photography, this design features a soft, glowing orb of vibrant color centered on the nail, fading into a contrasting or neutral background. It looks mesmerizing and deeply atmospheric.

How to Make It:

  • Apply your desired base color (such as smoky grey, sheer nude, or midnight blue) and cure.
  • Using an airbrush tool, an eyeshadow sponge blending technique, or a wet blooming gel method, apply a contrasting bright color (like electric pink, neon purple, or sunset orange) directly in the center of the nail.
  • Softly feather out the edges of the colored orb so it creates a seamless, smoky gradient fade.
  • Cure the design and apply a glossy top coat to enhance the depth and dimension.

Tips and Variations:

  • Layer multiple aura colors (e.g., pink melting into yellow) for a multidimensional sunset effect.
  • Apply scattered holographic glitter flakes over the top for a starry, magical finish.

7. Velvet Cat-Eye Sparkle

The Look: Also known as magnetic velvet nails, this trend uses metallic magnetic polish manipulated by a specialized magnet wand to create a deep, shifting, luminous stripe that mimics the plush texture of crushed velvet.

How to Make It:

  • Apply a dark base color (like deep emerald, rich plum, or midnight black) to make the magnetic pigment pop, though many velvet gels can be worn on their own.
  • Apply a coat of magnetic cat-eye gel polish. Do not cure immediately.
  • Hold a strong magnet close to the sides of the nail for 10 to 15 seconds to push the metallic particles into a concentrated, glowing center beam.
  • Immediately flash cure each nail as you style it to lock the velvet effect in place.
  • Finish with a high-shine top coat to maximize the reflective optical illusion.

Tips and Variations:

  • Use a multi-directional magnet technique to create an aurora borealis swirling effect across the nail surface.
  • Pair deep navy velvet polish with silver star constellations for a cosmic masterpiece.

8. Micro-Dot Minimalist Art

The Look: For those who prefer understated elegance, micro-dot manicures offer maximum style with minimal clutter. A bare or sheer neutral nail is accented by a single tiny, perfectly placed dot at the base of the cuticle or floating in the center.

How to Make It:

  • Prep the nail and apply a strengthening sheer nude or milky white base coat. Cure thoroughly.
  • Dip the very tip of a fine dotting tool into metallic gold, stark black, or vibrant crimson gel polish.
  • Gently press the tool onto the nail right above the cuticle bed to leave a singular, crisp dot.
  • Cure the dot for 30 seconds.
  • Seal with a glossy top coat to protect the design from chipping.

Tips and Variations:

  • Use a cluster of three micro-dots in a triangle formation instead of just one.
  • Alternate dot colors on each finger, using a rainbow spectrum for a subtle, colorful touch.

9. Metallic Chrome Edging

The Look: Edgy yet sophisticated, this design frames the natural shape of the nail with a razor-thin, mirror-shine metallic chrome outline. It looks like liquid gold or silver poured delicately around your fingertips.

How to Make It:

  • Apply a neutral milky base or a clean negative-space manicure foundation. Cure.
  • Paint a non-wipe top coat over the entire nail or precisely where you want your metallic frame to sit, then cure.
  • Using an ultra-fine detail brush, paint the outline of the nail bed or free edge using a specialized chrome painting gel.
  • Cure the painted lines, then immediately rub gold or silver chrome powder directly over the sticky lines using a sponge applicator.
  • Dust away excess powder, cure, and seal the entire nail with a top coat.

Tips and Variations:

  • Combine a classic French tip with a matching metallic inner frame line for a double-border effect.
  • Use rose gold chrome on a milky lavender base for a softer, romantic metallic look.

10. Milky White Daisy Fields

The Look: Sunny, sweet, and bursting with nostalgic charm, tiny white daisy petals arranged around golden yellow centers transform your hands into a blooming spring meadow. This look is universally flattering and incredibly cheerful.

How to Make It:

  • Apply a clean, opaque nude or soft pink base polish. Cure.
  • Use a fine detail brush or a small dotting tool to place four to five oval white dots in a circle, leaving a small open space in the middle.
  • Dip a clean dotting tool into bright yellow gel and place a single dot right in the center of the white petals.
  • Cure the floral design.
  • Apply a smooth, glossy top coat to protect the petals and enhance longevity.

Tips and Variations:

  • Place daisies lazily climbing up the side of one diagonal nail for an asymmetrical, modern layout.
  • Paint daisies on top of a pastel yellow or mint green base instead of nude.

11. Sheer Milky Ombre (Babyboomer)

The Look: Clean, sophisticated, and timelessly bridal, the babyboomer nail features a seamless gradient fade from a natural nude nail bed to a soft, milky white tip. It is the gold standard for understated, expensive-looking hands.

How to Make It:

  • Apply a nude or pink base gel to the lower half of the nail and cure.
  • Apply a white gel polish to the tip area.
  • Using a specialized ombre sponge or a clean gradient blending brush, softly tap and feather the transition zone where the white and pink meet until no harsh lines remain.
  • Cure the gradient layer. Repeat the process for opacity.
  • Finish with a high-gloss top coat to create a glass-like finish.

Tips and Variations:

  • Dust a light layer of pearl chrome powder over the finished ombre for an extra glazed-donut luminosity.
  • Add tiny encapsulated dried flowers inside the transition zone for a botanical twist.

12. Abstract Tortoiseshell Accents

The Look: Rich, warm, and endlessly chic, tortoiseshell print brings a touch of vintage luxury and texture to your manicure. When paired with sheer amber tones and deep espresso patches, it exudes quiet confidence.

How to Make It:

  • Apply a sheer warm amber or honey-yellow gel base across the nail. Cure.
  • Dab irregular, organic blobs of deep brown or black gel randomly across the surface while the amber base is still wet or using a blooming gel technique.
  • Drop a tiny touch of clear builder gel or lighter amber over the dark spots to make them blur softly into the background, mimicking genuine tortoiseshell depth.
  • Cure and seal with a glossy top coat.

Tips and Variations:

  • Use tortoiseshell print exclusively on diagonal French tips paired with solid black base nails.
  • Add thin gold foil accents framing the tortoiseshell patches.

13. Y2K Starburst and Piercing Charms

The Look: Taking inspiration from early 2000s pop culture, this bold style features sharp, graphic starbursts (often called indie sleaze or emo stars) accompanied by tiny metallic ring piercings or hanging gemstone charms.

How to Make It:

  • Paint your nails in a striking solid color like jet black, hot pink, or chrome silver. Cure.
  • Use a fine liner brush to draw multi-pointed geometric starbursts using white or metallic silver polish.
  • Add a tiny rhinestone or metallic stud right in the absolute center of each starburst.
  • If using a piercing charm, use a hand drill to create a tiny hole at the very tip of an acrylic nail extension and attach a small metal jump ring.
  • Seal the painted designs with a durable top coat.

Tips and Variations:

  • Paint neon green starbursts on a sheer black jelly base for an edgy, cyber-punk aesthetic.
  • Keep the starbursts outlined in holographic foil for maximum light reflection.

14. Negative Space Heart Cutouts

The Look: Romantic and cleverly minimalist, this design leaves bare negative-space hearts framed by vibrant blocks of color or delicate glitter outlines. It lets your natural nail peek through in the most adorable shape imaginable.

How to Make It:

  • Apply a strip of heart-shaped vinyl stencil or paint around a heart-shaped sticker placed in the center of a bare, prepped nail.
  • Paint the surrounding area of the nail in your chosen color (such as cherry red, baby blue, or lavender), making sure not to get polish inside the heart stencil.
  • Carefully peel away the stencil before the polish fully cures to ensure a crisp edge.
  • Cure the surrounding polish.
  • Use a fine liner brush to trace the perimeter of the bare heart with gold or white detail lines.
  • Finish with a glossy top coat over the entire nail.

Tips and Variations:

  • Fill the negative space heart with a sheer wash of glitter while keeping the outer border a solid pastel.
  • Scatter multiple tiny negative space hearts cascading down the side of the nail.

15. Pastel Checkerboard Retro

The Look: Playful, groovy, and reminiscent of 1970s fashion, a soft pastel checkerboard pattern brings instant visual interest and cheerful energy to your fingertips. It is a fantastic statement look that works great on almond or square nails.

How to Make It:

  • Apply an opaque base coat of a light pastel shade, such as butter yellow or lilac. Cure.
  • Using a fine nail art brush, draw a grid of intersecting horizontal and vertical lines across the nail.
  • Fill in alternate squares with a contrasting pastel color (like mint green or baby pink) to create the classic checkerboard grid.
  • Cure the design completely.
  • Seal with a high-shine top coat to ensure a smooth, professional finish.

Tips and Variations:

  • Mix checkerboard patterns on two accent nails with solid pastel polish on the remaining fingers.
  • Use neutral tones (chocolate brown and cream) for a more subdued, vintage-inspired checkerboard.

16. Holographic Butterfly Wing Accents

The Look: Ethereal and magical, iridescent butterfly wing patterns shimmer with shifting blues, purples, and pinks as your hands move. It captures the enchanting, delicate beauty of nature.

How to Make It:

  • Apply a sheer iridescent or holographic base polish. Cure.
  • Using a fine black liner brush, carefully draw intricate, delicate stained-glass lines that mimic the cellular structure of a butterfly wing near the cuticle or tip.
  • Fill the interior compartments of the wings with translucent colored jelly polishes or holographic flakies.
  • Cure the detailed linework.
  • Apply a glossy top coat to lock in the flakies and create a smooth, protective shield.

Tips and Variations:

  • Apply pre-made holographic butterfly wing foils onto a sticky base layer for an effortless, intricate finish.
  • Pair with soft lavender gradient backgrounds to make the holographic tones pop.

17. Shimmery Metallic Hearts and Flakes

The Look: Luxurious and texturally rich, this style embeds glittering metallic foil flakes and hand-painted golden hearts within a translucent, jelly-tinted base. It looks like precious jewels trapped inside warm amber resin.

How to Make It:

  • Apply a sheer jelly pink or peach base coat and cure.
  • Press irregular flecks of gold leaf foil onto the tacky inhibition layer of the base coat using an orange wood stick.
  • Paint small, elegant metallic gold hearts floating above the embedded foil flakes using a fine detail brush.
  • Apply a second sheer jelly coat over the entire design to create a floating, multi-dimensional depth effect.
  • Cure and finish with a high-shine glossy top coat.

Tips and Variations:

  • Use silver foil flakes and silver metallic hearts for a cool-toned winter wonderland aesthetic.
  • Keep the design centered on a structured almond nail shape for maximum elegance.

18. Subtle Smudged Watercolor Florals

The Look: Soft, romantic, and painterly, watercolor florals feature blurred, bleeding pastel petals that look like watercolors blooming on wet paper. It is sophisticated, artistic, and deeply calming to look at.

How to Make It:

  • Apply a clean, milky white base coat and cure.
  • Drop a small amount of blooming gel or clear alcohol across the nail surface without curing yet.
  • Using a fine brush dipped in diluted pastel pink, lavender, and soft yellow, drop pigment onto the wet surface and watch the colors softly bloom and feather outward into organic floral shapes.
  • Once the desired watercolor bloom is achieved, flash cure the nail.
  • Add tiny dots of golden yellow in the center of the bloomed petals for stamen details. Cure and seal with a glossy top coat.

Tips and Variations:

  • Paint delicate olive green stems connecting the blurred floral clusters down the side of the nail.
  • Use moody jewel tones (deep plum and emerald) on a dark base for a dramatic evening watercolor look.

19. Classic French with Neon Pops

The Look: A daring update to the traditional French manicure, this look pairs a timeless nude base with ultra-thin, neon-colored smile lines (such as electric lime, hot pink, or neon orange) that demand attention.

How to Make It:

  • Apply a natural sheer nude or pink base polish across the entire nail bed. Cure.
  • Using an ultra-fine striping brush dipped in vibrant neon gel polish, draw a razor-thin, crisp French tip along the smile line, sweeping slightly down the sides of the nail.
  • Clean up any edges with a brush dipped in isopropyl alcohol for absolute precision.
  • Cure the neon tips.
  • Finish with a protective, high-shine glossy top coat.

Tips and Variations:

  • Use a different neon color on each finger for a playful, rainbow-tipped summer statement.
  • Pair neon orange tips with a subtle gold chrome outline running directly beneath the neon line.

20. Golden Constellation Starlight

The Look: Mystical, celestial, and deeply sophisticated, deep midnight blue or charcoal bases adorned with tiny gold foil stars, crescent moons, and constellation maps bring the beauty of the night sky right to your fingertips.

How to Make It:

  • Apply two coats of a rich, opaque midnight blue or deep plum gel polish. Cure completely.
  • Using a fine liner brush dipped in metallic gold paint, draw delicate stars, cross-shaped glimmers, and curving constellation lines connecting tiny dots.
  • Alternatively, apply delicate gold star and moon nail stickers onto the cured dark base.
  • Cure the painted constellations.
  • Seal the entire look with a glossy top coat to ensure the gold details shine brilliantly without dulling.

Tips and Variations:

  • Apply a matte top coat over the midnight blue base while keeping the gold stars glossy for a stunning tactile contrast.
  • Add scattered holographic micro-glitter to simulate distant galaxies in the background.

More Ideas to Come in Future Addition