Transforming your living space into a dreamy, curated sanctuary does not require a luxury budget or a professional interior designer. In fact, some of the most captivating, soul-warming decor pieces are the ones you craft yourself or curate mindfully. If you are looking to elevate your home with subtle elegance, cozy textures, and modern minimalism, you are in the right place.
Below are 20 gorgeous, Pinterest-worthy home accents that you can create or source for under $20. Each idea includes a complete breakdown of materials, step-by-step instructions, styling tips, and creative variations so you can truly make each piece your own.
1. Textured Plaster Pillar Candleholders
Minimalist, sculptural shapes are dominating contemporary interior design, and textured plaster candleholders add instant architectural interest to any mantel or coffee table.
Materials Needed
- Air-dry clay or cylindrical cardboard cores (like sturdy paper towel rolls cut to size)
- Joint compound or plaster of Paris
- A palette knife or sponge
- Acrylic paint in matte white, warm beige, or stone grey
- Sandpaper (fine grit)
Step-by-Step Instructions
- Form the Base: If using clay, mold it into thick, organic cylindrical columns with slight irregularities for a handmade look. If using cardboard cores, glue them to a sturdy flat base.
- Apply Texture: Using a palette knife, coat the entire surface with a thick layer of joint compound. Create sweeping, tactile motions or stipple the surface with a sponge for a rustic stone finish.
- Dry and Smooth: Let it dry completely for 24 hours. Gently sand down any sharp edges or rough burrs that might interfere with stability.
- Paint: Finish with two coats of matte acrylic paint, sealing it with a clear matte varnish if desired.
Styling Tips & Variations
- Styling: Cluster three pillars of varying heights on a travertine tray alongside a dried eucalyptus stem.
- Variation: Mix fine sand directly into the wet plaster before applying it to create a heavy, authentic sandstone texture.
2. Pressed Botanical Floating Frames
Bring the serene beauty of nature indoors with delicate, double-glass floating frames that showcase pressed leaves, wildflowers, or ferns.
Materials Needed
- Two identical glass photo frames (or floating glass clip frames)
- Collected dried leaves, pressed ferns, or delicate pressed wildflowers
- Tweezers
- Acid-free mounting tape or tiny dots of clear glue
Step-by-Step Instructions
- Press and Dry: Collect fresh leaves and flowers and press them inside heavy books lined with parchment paper for at least two weeks until completely flat and dry.
- Open the Frame: Disassemble the glass floating frame and clean both inner glass panels thoroughly with glass cleaner to remove dust and fingerprints.
- Arrange: Using tweezers, carefully position your pressed botanicals in the center of the bottom glass pane. Secure them with a micro-dot of clear glue on the stem or back so they don’t slip.
- Seal: Place the second glass pane on top, secure the frame clips or edges, and wipe the outside clean.
Styling Tips & Variations
- Styling: Hang a trio of these frames vertically on a narrow hallway wall painted in a soft, muted sage green.
- Variation: Use translucent vellum paper with hand-written calligraphy poetry layered behind the pressed ferns for a romantic, vintage library aesthetic.

3. Minimalist Ceramic-Look Jesmonite Tray
A sleek, organic catch-all tray instantly organizes clutter while adding high-end texture to your vanity, entryway console, or bedside table.
Materials Needed
- Jesmonite AC100 starter kit (liquid and base powder) or casting plaster
- Silicone oval or irregular cloud-shaped tray mold
- Digital weighing scale
- Acrylic pigments (optional, for subtle terrazzo flecks or solid terracotta tones)
- Fine sandpaper
Step-by-Step Instructions
- Measure and Mix: Weigh out the powder and liquid according to your casting kit instructions (usually a 2.5:1 ratio). Stir slowly to avoid air bubbles.
- Add Color: If desired, mix in a few drops of earth-toned pigment. For a terrazzo effect, crumble small dry chips of a contrasting cured plaster mix into the liquid.
- Pour: Pour the mixture slowly into the silicone mold. Gently tap the sides of the mold to release trapped air bubbles to the surface.
- Cure and Sand: Let it set for 30–40 minutes before demolding. Once fully dry, wet-sand the edges with fine-grit sandpaper for a buttery-smooth, high-end ceramic feel.
Styling Tips & Variations
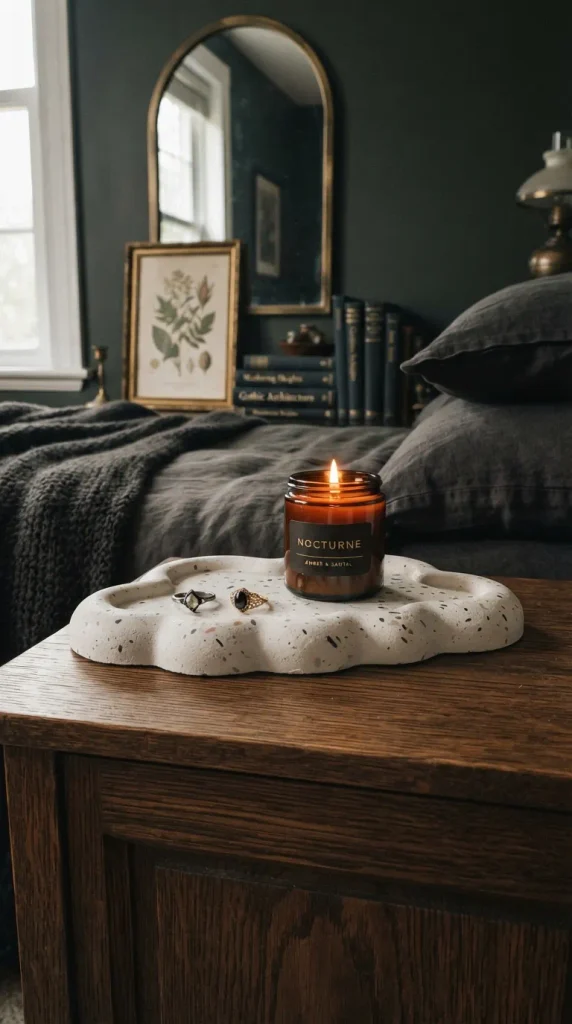
- Styling: Rest the tray on a wooden nightstand to hold your everyday rings, a small glass dropper bottle of facial oil, and a lit amber jar candle.
- Variation: Create a dual-tone marbled tray by pouring two contrasting pigment mixes into the mold simultaneously and swirling them gently with a toothpick.

4. Modern Arch Wall Hanging with Raw Wood Beads
Soften hard architectural lines and introduce organic warmth with a structural fabric and wood wall hanging featuring modern arched geometry.
Materials Needed
- Heavyweight cotton canvas or linen fabric remnants
- Fabric scissors and textile stiffener (or a diluted white glue mixture)
- Wooden dowel or a smooth branch foraged from outdoors
- Natural jute twine or leather cord
- Large unfinished wooden beads
Step-by-Step Instructions
- Cut the Shape: Cut your fabric into a clean, modern arch silhouette, ensuring the top is wide enough to wrap around your dowel.
- Stiffize: Paint the back of the fabric with textile stiffener and let it dry flat so the arch holds its crisp shape without curling at the edges.
- Attach to Dowel: Fold the top edge over your wooden dowel or branch and secure it with fabric glue or neat hand-stitching.
- Add Beads: Thread natural wood beads onto the hanging cord on either side of the dowel, knotting securely at the ends.
Styling Tips & Variations
- Styling: Hang this accent piece above a small accent chair in your reading nook or beside a bedroom vanity mirror.
- Variation: Paint color-blocked terracotta and olive arches directly onto the canvas using acrylic fabric paint before assembling.

5. Rattan-Wrapped Glass Bud Vases
Combine clean glass with natural woven textures to create breezy, bohemian bud vases that look stunning even when empty.
Materials Needed
- Simple glass bottles or jars (recycled olive oil or kombucha bottles work wonderfully)
- Natural rattan webbing or thin cane reed
- Hot glue gun and clear glue sticks
- Sharp utility scissors
- Jute twine or cotton ribbon
Step-by-Step Instructions
- Prep the Glass: Wash and dry your glass bottles thoroughly, removing all labels and adhesive residue.
- Measure and Cut: Cut a strip of rattan webbing or soak thin cane reed in warm water for 15 minutes to make it pliable, then cut it to fit snugly around the neck or body of the bottle.
- Secure: Apply a thin line of hot glue along the vertical seam and press the rattan firmly around the glass surface. Hold until set.
- Embellish: Wrap a length of rustic jute twine or delicate linen ribbon several times around the bottle neck, finishing with a neat bow.
Styling Tips & Variations
- Styling: Group three different heights together on a woven rattan placemat on your dining table, filled with single stems of pampas grass or dried bunny tails.
- Variation: Spray-paint the glass bottle in matte white before wrapping the rattan for a striking two-tone coastal modern contrast.

6. Neutral Textured Canvas Art (Wabi-Sabi Style)
Create gallery-worthy abstract art using simple household items, thick texture pastes, and neutral tones that evoke calm and understated luxury.
Materials Needed
- Stretched canvas (any size, e.g., 12×16 inches)
- Gesso or standard wall spackle/joint compound
- Old plastic credit cards, putty knives, or textured combs
- Acrylic paint in warm beige, raw umber, or cream
Step-by-Step Instructions
- Prep the Canvas: Apply a base coat of gesso to seal the canvas fabric and let it dry.
- Build Texture: Scoop generous amounts of wall spackle onto the canvas. Use a putty knife, spatula, or the edge of a credit card to sweep, scrape, and mold thick, tactile ridges, waves, or geometric lines.
- Dry Completely: Allow the thick paste to cure completely over 24 to 48 hours (avoid placing it in direct artificial heat to prevent cracking).
- Paint and Glaze: Once dry, paint over the entire piece with a creamy neutral tone. Wipe a slightly darker beige wash into the crevices to accentuate the shadows and depth.
Styling Tips & Variations
- Styling: Lean the canvas casually against a living room shelf or mantel without hanging it for an effortless, casual studio vibe.
- Variation: Create a minimalist grid or ribbed linear pattern by dragging the teeth of a notched trowel through the wet spackle.


7. Chunky Knit Decorative Knot Pillow
Add tactile coziness and a playful sculptural touch to your sofa or bed with a chic, handmade knot cushion created from soft jersey knit tubing.
Materials Needed
- 3 to 4 yards of stuffed jersey knit tubing (or DIY tubes made from jersey fabric stuffed with polyfill)
- Sewing needle and matching thread
- Scissors
Step-by-Step Instructions
- Prepare the Tube: If making your own, sew long strips of soft jersey knit fabric right-sides together, turn inside out, fill evenly with fluffy polyester fiberfill, and stitch closed.
- Weave the Knot: Lay the stuffed tube flat and follow a classic monkey-fist or square-knot weaving pattern, looping the tube over and under itself sequentially.
- Tuck and Secure: Continue weaving until you use up the length, tucking the loose ends neatly into the interior pockets of the knot structure.
- Stitch Hidden Seams: Use matching thread to invisibly tack the ends and cross-sections together so the cushion retains its plump, geometric shape.
Styling Tips & Variations
- Styling: Place the knot pillow front-and-center on a neutral linen duvet cover for an instant textural focal point.
- Variation: Use rich velvet tubing in deep olive green or burnt amber for a luxurious, moodier aesthetic.
8. Scalloped Edge Ceramic Trinket Dish
Scalloped edges are having a major moment in home decor, adding a sweet, whimsical vintage charm to everyday catch-all dishes.
Materials Needed
- Air-dry ceramic clay (white or terracotta)
- A rolling pin and smooth surface (parchment paper)
- A small bowl or round cookie cutter as a template
- A butter knife or clay carving tool
- Waterproof acrylic sealer or glossy varnish
Step-by-Step Instructions
- Roll the Clay: Roll out your air-dry clay evenly on parchment paper to a thickness of about one-quarter inch.
- Cut the Circle: Press your round cookie cutter or trace around a small bowl with a knife to cut out a clean circle.
- Create Scallops: Using a small curved tool, spoon edge, or your fingertips, gently press and pinch small semi-circle scallops all along the rim of the dish. Curve the outer edges upward slightly to form a shallow basin.
- Dry and Seal: Let the dish dry completely for 48 hours, flipping halfway through. Apply two coats of glossy waterproof sealer to give it a glazed porcelain finish.
Styling Tips & Variations
- Styling: Use it on your entryway console table to catch keys, or by the kitchen sink to hold your rings while washing dishes.
- Variation: Paint a delicate hand-drawn gold or forest green trim along the scalloped rim for an heirloom porcelain look.
9. Minimalist Floating Wood and Leather Wall Shelf
Combine natural pine wood with slender leather straps for a Scandinavian-inspired floating shelf that brings effortless style to unused wall spaces.
Materials Needed
- A small wooden board (e.g., pine or oak, cut to 12×6 inches), sanded smooth
- Two strips of genuine leather or faux leather (approx. 1 inch wide by 18 inches long)
- Screws, wall anchors, and a screwdriver
- Wood stain or clear matte wood oil
Step-by-Step Instructions
- Finish the Wood: Sand your wooden board until smooth and apply your choice of wood stain or nourishing clear beeswax oil. Let it dry.
- Prepare the Straps: Fold each leather strip in half to form loops that will cradle the ends of the wooden board.
- Mount to Wall: Hold the looped leather straps against the wall at your desired spacing. Drive a screw through the overlapping ends of each leather loop directly into wall anchors so that the loops hang downward.
- Insert Shelf: Slide the wooden board horizontally through both hanging leather loops, adjusting until level and secure.
Styling Tips & Variations
- Styling: Style with a trailing pothos plant in a small terracotta pot and a favorite paperback book.
- Variation: Use brass Chicago screws and heavy-duty saddle leather for an industrial-chic study or office look.
10. Floating Pillar Candle Hurricane Lamp
Create a dramatic, cozy glow with a modern glass hurricane cylinder paired with a floating wick disc in a pool of scented oil and water.
Materials Needed
- A clear glass cylinder vase or hurricane glass
- Decorative elements for the base (smooth river stones, coffee beans, or dried citrus slices)
- Water and a few drops of essential oil (optional)
- Floating wick discs and floating wicks
- Cooking oil or specialized lamp oil
Step-by-Step Instructions
- Layer the Base: Place your decorative elements (like coffee beans or dried orange slices and rosemary sprigs) at the bottom of the clean glass cylinder.
- Add Water: Fill the cylinder with water, leaving about two inches of space at the top.
- Add Oil: Pour a thin layer (about one-quarter inch) of clear lamp oil or vegetable oil directly on top of the water.
- Float and Ignite: Place a floating wick into the center of a small plastic or cork floating disc, gently set it on top of the oil layer, and light the wick.
Styling Tips & Variations
- Styling: Set this centerpiece on your dining table during evening dinners for warm, ethereal ambient lighting.
- Variation: Fill the water with fresh cranberry sprigs and floating pine needles for a winter holiday table setting.
11. Pressed Flower Resin Coaster Set
Craft glossy, modern coasters that encapsulate the delicate beauty of dried petals and botanical stems permanently in crystal-clear resin.
Materials Needed
- Clear epoxy casting resin (two-part kit)
- Silicone round or hexagonal coaster molds
- Dried petals, pressed flowers, and gold leaf flakes
- Mixing cups, wooden stir sticks, and a mini heat gun (or lighter for bubbles)
Step-by-Step Instructions
- Mix Resin: In a well-ventilated space, carefully measure and mix equal parts of the two-part epoxy resin according to the product instructions. Stir gently for 3 minutes.
- First Pour: Pour a thin base layer of clear resin into your silicone molds. Pop any surface bubbles with a gentle pass of a heat gun.
- Arrange Florals: Using tweezers, place your dried flowers and gold leaf flakes face down into the resin layer.
- Final Pour: Pour the remaining resin over the flowers to completely submerge them. Let cure undisturbed for 24 to 48 hours before demolding.
Styling Tips & Variations
- Styling: Stack these glossy botanical coasters on a coffee table next to a stack of art books.
- Variation: Use deep emerald green tinted resin with dried ferns for a moody, woodland-inspired aesthetic.
12. Modern Reed Diffuser in Amber Glass Bottle
Elevate your home fragrance game while adding a clean, apothecary-inspired accent to your bathroom or living room shelving.
Materials Needed
- An amber glass apothecary bottle or vintage perfume bottle with a narrow neck
- Carrier oil (such as sweet almond oil, fractionated coconut oil, or safflower oil)
- High-quality essential oils (e.g., lavender, eucalyptus, or sandalwood)
- Natural rattan diffuser reeds
Step-by-Step Instructions
- Mix Base Oil: Pour half a cup of your chosen carrier oil into a small mixing container.
- Add Scent: Stir in 25 to 35 drops of your favorite essential oils until you achieve a robust, pleasant scent blend.
- Bottle It: Carefully pour the scented oil mixture into your clean amber glass bottle using a small funnel.
- Add Reeds: Insert 6 to 8 natural rattan reeds into the bottle. Allow the oil to travel up the reeds for a few hours, then flip the reeds to jump-start the fragrance diffusion.
Styling Tips & Variations
- Styling: Place the amber bottle on a small marble tray in your guest bathroom alongside folded linen hand towels.
- Variation: Tie a strip of gingham ribbon or leather cord around the neck of the bottle for added textural detail.
13. Woven Raffia Coasters with Scalloped Cotton Trim
Introduce coastal warmth and tactile cottagecore charm to your table settings with handmade woven raffia coasters.
Materials Needed
- Natural raffia ribbon or thin straw cord
- A needle and sturdy cotton embroidery floss
- Thick felt backing circles (cut to size)
- Hot glue gun
Step-by-Step Instructions
- Form the Base: Coil your natural raffia tightly into a flat circle, securing every few turns with hidden stitches of embroidery floss in a blanket stitch or spiral stitch.
- Finish Edges: Once you reach a diameter of approximately 4 inches, knot and trim the raffia end securely.
- Add Backing: Cut a felt circle slightly smaller than your woven coaster and glue it to the back to protect tabletops and give a clean finish.
- Optional Trim: Glue a delicate cotton lace or ric-rac trim around the outer perimeter.
Styling Tips & Variations
- Styling: Pair these coasters with iced matcha lattes or fresh lemonade during sunlit afternoon patio sessions.
- Variation: Use dyed pastel pink or sage green raffia for a soft, contemporary color palette.
14. Plaster-Dipped Decorative Bookends
Transform inexpensive paperback books or salvaged wooden blocks into heavy, modern architectural bookends using plaster and matte paint.
Materials Needed
- Two old hardcover books you no longer read or heavy wooden blocks
- Joint compound or casting plaster
- A wide paintbrush or putty knife
- Matte black, terracotta, or off-white acrylic paint
Step-by-Step Instructions
- Glue Books Closed: If using old books, glue the pages shut securely along the outer edges using wood glue so the book acts as a solid, uniform block.
- Coat in Plaster: Apply a thick, uneven layer of joint compound over the entire exterior of the book or block, creating organic ridges and texture.
- Cure: Let the plaster dry completely for 24 hours until rock hard.
- Paint: Paint over the textured plaster surface with two coats of matte paint in your chosen aesthetic tone.
Styling Tips & Variations
- Styling: Use them to prop up your favorite interior design coffee table books on an open bookshelf.
- Variation: Leave the plaster unpainted with a raw white concrete finish for a stark industrial-minimalist look.


15. Minimalist Wire and Air Plant Wall Display
Bring sculptural greenery into your space with a delicate geometric wall art piece that requires zero soil and minimal maintenance.
Materials Needed
- Craft wire (brass or black iron wire, 16-gauge)
- Wire cutters and needle-nose pliers
- Small tillandsia (air plants)
- Fine fishing line or jute cord for hanging
Step-by-Step Instructions
- Shape the Geometry: Using your pliers, bend the brass wire into clean geometric shapes such as a diamond, rhombus, or nested triangles.
- Create Cradles: Twist the wire at the base to create a small spiral cradle or basket specifically sized to securely hold an air plant.
- Connect and Balance: Secure all wire joints firmly by wrapping the ends tightly around adjacent wire sections.
- Hang: Attach a loop of fine fishing line to the top vertex so the entire sculpture appears to float when hung on the wall.
Styling Tips & Variations
- Styling: Create a constellation of three different geometric shapes grouped together on a blank white or warm taupe accent wall.
- Variation: Spray the finished wire frame with a metallic gold finish for a touch of refined glamour.
16. Hand-Painted Ceramic-Style Jewelry Bowl
Create an heirloom-feeling trinket dish adorned with delicate hand-painted botanical motifs reminiscent of vintage European ceramics.
Materials Needed
- Air-dry clay
- A small bowl (to use as a mold)
- Fine-tip acrylic paint pens (blue, terracotta, and olive green)
- Clear glossy varnish
Step-by-Step Instructions
- Mold the Dish: Roll out clay to one-quarter inch thickness, drape it gently inside the interior of a small inverted bowl to form a curved basin, and trim excess edges.
- Dry: Let it dry for 48 hours until completely firm, then carefully lift it out.
- Paint Florals: Using fine-tip acrylic paint pens, draw delicate botanical vines, olives, or dainty wildflowers around the interior rim of the bowl.
- Seal: Coat the entire painted dish with two layers of high-gloss varnish to simulate a true glazed ceramic finish.
Styling Tips & Variations
- Styling: Place on a vanity table to hold delicate gold hoop earrings and stud rings.
- Variation: Paint a classic blue-and-white Delft tile pattern for a timeless, traditional aesthetic.
17. Botanical Pressed Fern Shadow Box
Create striking botanical wall art by suspending dried fern fronds inside a deep shadow box frame for a dramatic 3D effect.
Materials Needed
- A deep shadow box frame (at least 1 to 2 inches in depth)
- Large dried fern fronds or eucalyptus branches
- Linen fabric or heavy cream cardstock for the background
- Clear mounting tape or sewing pins
Step-by-Step Instructions
- Prepare Background: Cut your linen fabric or cardstock to fit snugly inside the back panel of the shadow box frame.
- Position Plant: Arrange your dried fern frond centrally against the fabric background.
- Secure: Secure the stem delicately using tiny dabs of clear glue or discreet sewing pins pressed into the foam backing.
- Assemble Frame: Place the glass cover on top and seal the shadow box securely.
Styling Tips & Variations
- Styling: Hang above a console table paired with a tall ceramic vase filled with dried branches.
- Variation: Spray paint the fern frond in matte gold before mounting for a glamorous art-deco twist.
18. Braided Jute and Cotton Table Runner
Add organic warmth and casual texture to your dining table or kitchen island with a handmade, two-tone braided runner.
Materials Needed
- Natural jute cord (thick gauge)
- Thick unbleached cotton rope or yarn
- Strong fabric glue or heavy-duty sewing machine with a denim needle
- Scissors
Step-by-Step Instructions
- Cut Strands: Cut three long strands of jute cord and three strands of cotton rope to your desired table runner length (approx. 40 to 60 inches).
- Braid: Tie the top ends together securely and braid the jute and cotton strands together in a tight, even three-strand braid.
- Secure Ends: Secure both ends tightly with heavy thread bindings or fabric glue so they do not unravel.
- Side-by-Side Assembly: Create multiple identical braids and glue or machine-stitch them side-by-side until you reach your desired runner width (approx. 12 inches).
Styling Tips & Variations
- Styling: Lay down the runner as a centerpiece base beneath a cluster of amber apothecary candles and ceramic vases.
- Variation: Weave dried lavender sprigs intermittently through the braid for a subtle, natural aroma.
19. Aesthetic Minimalist Wooden Peg Wall Hook
Maximize vertical storage while maintaining a clean, organic Scandinavian minimalist aesthetic with a custom peg rail.
Materials Needed
- A rectangular strip of oak or pine wood (approx. 18×3 inches)
- 3 to 4 wooden shaker pegs or wooden dowels cut to size
- Wood glue and drill
- Wall mounting hardware and sandpaper
Step-by-Step Instructions
- Prep the Wood: Sand your wooden strip until exceptionally smooth. Mark evenly spaced spots for your pegs.
- Drill Holes: Drill shallow pilot holes into the marked spots on the front face of the board, ensuring they match the diameter of your shaker pegs.
- Attach Pegs: Apply wood glue inside each hole and tap the wooden shaker pegs firmly into place with a mallet. Wipe away excess glue.
- Mount: Secure the finished peg rail to wall studs using concealed screw pockets or stylish metal standoff wall mounts.
Styling Tips & Variations
- Styling: Mount in your entryway to hang a straw sun hat, a canvas tote bag, and a lightweight linen trench coat.
- Variation: Paint the wooden board in a soft muted sage or olive tone while leaving the pegs in their natural raw wood finish.
20. Stained Glass-Effect Window Cling Panel
Catch the afternoon sunlight and cast gorgeous prismatic rainbows across your room with a faux stained glass suncatcher film panel.
Materials Needed
- Transparent glass or acrylic sheet (cut to fit your window pane)
- Stretchy clear window film or holographic prism window cling film
- Permanent black glass paint or fine black puffy paint
- Craft knife and squeegee card
Step-by-Step Instructions
- Draw Outlines: Use black glass paint to draw stained-glass style geometric leading lines and botanical motifs directly onto your acrylic sheet or glass panel. Let dry.
- Apply Cling Film: Cut pieces of holographic prism window film to fit inside the black paint outlines.
- Smooth Surfaces: Spray a tiny mist of soapy water onto the glass, apply the cling film, and use a squeegee card to push out all air bubbles and water.
- Trim Edges: Trim any excess film cleanly with a sharp craft knife along the black painted border lines.
Styling Tips & Variations
- Styling: Stand this panel on a sunny windowsill where afternoon rays will catch it and scatter dancing rainbows across your walls.
- Variation: Create botanical pressed flower designs bordered by organic stained-glass leading lines.


