Summer crafting with early learners does not have to mean neon glitter, chaotic primary colors, or throwaway paper projects. A modern approach brings natural textures, subtle palettes, organic materials, and intentional design into the early childhood art studio. These activities introduce toddlers and preschoolers to fine-motor coordination, sensory exploration, and tactile creativity while producing timeless keepsakes you will genuinely want to display on your shelves, mantels, and dining tables.
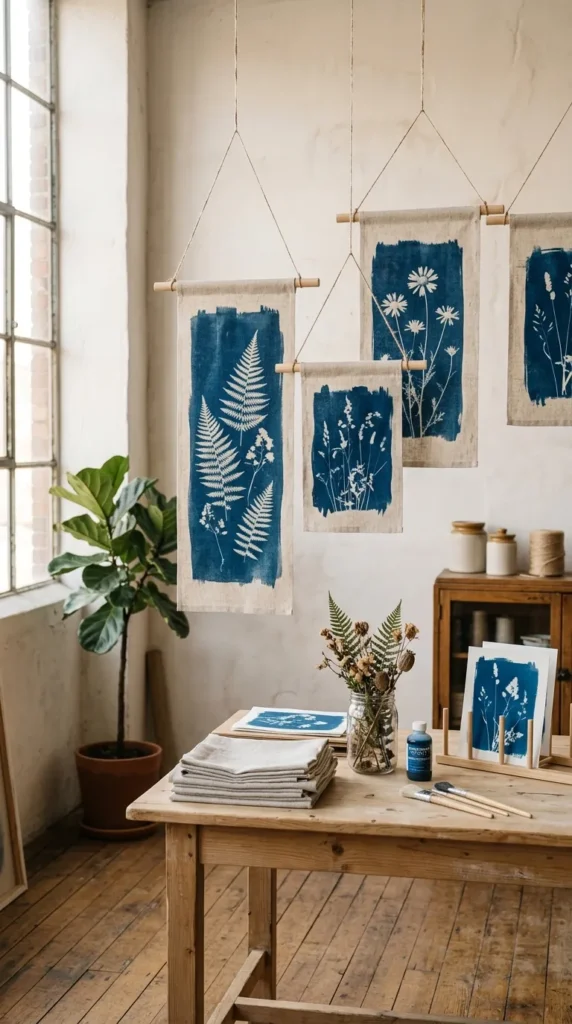
1. Botanical Sun-Printed Linen Banners
Introduction
Sun printing on raw fabric bridges the gap between historical photography and sensory backyard foraging. Preschoolers collect botanical elements, arrange them deliberately on naturally treated fabric, and watch natural light permanently etch the silhouette of their flora.
What This Idea Means
This craft celebrates sunlight, patience, and the negative space created by native greenery. It teaches children to observe the contours of leaves, fern fronds, and garden petals, turning natural summer sunlight into an artistic medium.
Materials Needed
- Cyanotype-treated raw linen swatches or pre-treated sun print fabric
- Foraged flat leaves, delicate fern fronds, and broad petals
- Heavy acrylic sheet or clear glass pane
- Wooden display dowel and natural jute twine
- Flat tray filled with cold water
How to Make It
- Take children on a mindful morning nature walk to gather flat botanical specimens with distinct silhouettes.
- In a shaded space, place the pre-treated fabric swatch flat on a sturdy backing board.
- Guide the preschooler in arranging their gathered botanicals across the surface.
- Carefully place the clear acrylic sheet over the botanicals to hold them flush against the linen.
- Expose the setup to direct midday sunlight for 3 to 8 minutes until the fabric turns a pale bronze tone.
- Submerge the exposed linen immediately in cold water, agitating gently for 5 minutes until the unexposed areas rinse completely white and the background settles into a deep Prussian blue.
- Let the fabric dry flat on a linen towel.
- Fold the top edge over a small wooden dowel, secure it with fabric glue or a simple whipstitch, and tie a length of jute twine for hanging.
Tips and Variations
- Press dense leaves under heavy books for 15 minutes before exposure to ensure clean contact lines.
- Swap standard blue cyanotype fabric for sun-sensitive fabric dyes in charcoal or earthy olive green for an ultra-neutral modern look.
2. Minimalist Pressed Wildflower Clay Dishes
Introduction
Small hands love the cooling, moldable texture of soft clay. Pressing fragile summer blossoms into neutral air-dry clay creates elegant trinket trays that hold small treasures, coins, or summer seaside shells.
What This Idea Means
This project is about tactile grounding and delicate motor control. Children learn the relationship between three-dimensional pressure and surface impressions, capturing the impermanence of summer garden blooms in solid stone-like clay.
Materials Needed
- Natural white or terracotta air-dry clay
- Miniature fresh summer blossoms (daisies, chamomile, clover, baby’s breath)
- Small rolling pin or smooth wooden cylinder
- Shallow ceramic bowl (to use as a shaping mold)
- Matte acrylic craft sealant
- Fine-grit sanding sponge
How to Make It
- Give the child a golf-ball-sized piece of air-dry clay and guide them to roll it into a smooth ball.
- Roll the clay flat on parchment paper until it is approximately 6mm thick.
- Let the child place miniature freshly picked blossoms petal-down onto the surface.
- Gently roll over the flowers once with light, even pressure to embed them into the clay surface.
- Carefully peel the flower parts away using child-safe tweezers or fingertips, leaving crisp botanical indentations.
- Cut a clean circle using a round cookie cutter or wide cup rim.
- Gently lift the clay disc and drape it inside a small shallow ceramic bowl so it cures in a curved tray shape.
- Allow the dish to cure for 48 hours. Once completely dry, smooth rough edges with a fine sanding sponge and seal with a coat of matte acrylic finish.
Tips and Variations
- Leave the impressions bare for a minimalist monochrome finish, or lightly dab dilute watercolor wash into the crevices before sealing.
- Use textured foliage like wild dill or lavender sprigs for intricate organic geometry.

3. Nordic Driftwood & Sea Glass Wind Chimes
Introduction
A seaside foraging expedition translates directly into a modern acoustic installation. Using smooth driftwood and ocean-tumbled sea glass wrapped in organic cotton twine, preschoolers assemble a gentle chime tuned to ocean breezes.
What This Idea Means
This craft emphasizes sensory appreciation of textures shaped by the ocean. It gives young children an intuitive understanding of weight balance, natural materials, and gentle sound architecture.
Materials Needed
- Sturdy sun-bleached driftwood branch (10 to 14 inches long)
- Tumbled sea glass pieces (frosted white, seafoam green, and soft amber)
- Organic cotton cord or unbleached hemp string
- 24-gauge copper craft wire
- Small wooden beads
How to Make It
- Let the preschooler sort sea glass by color and size, building tactile recognition and grouping skills.
- Pre-wrap the perimeter of each sea glass piece with soft copper wire to create secure attachment loops.
- Have the child string wooden beads and wire-wrapped glass onto lengths of cotton cord, tying simple knots beneath each item.
- Tie 4 to 5 completed strands evenly along the driftwood branch.
- Attach a central hanger strand to both ends of the main branch for balanced suspension.
Tips and Variations
- Add small, smooth river stones or brass jewelry bells between the sea glass pieces to create richer acoustic tones.
- Keep cord lengths staggered at irregular intervals to produce a deliberate, contemporary asymmetric aesthetic.

4. Beeswax & Marigold Dipped Luminaries
Introduction
Glowing golden beeswax combined with dried marigold and sunflower petals forms translucent, fragrant tea light lanterns that bring a warm, rustic ambiance to summer porch evenings.
What This Idea Means
Working with warm natural wax introduces children to phase changes in materials (solid to liquid to solid) while honing gentle hand-eye coordination.
Materials Needed
- 100% pure yellow beeswax pellets
- Small water balloons (filled with cool water)
- Dried edible summer petals (marigold, calendula, sunflower)
- Double boiler or temperature-controlled wax melting pot
- Heavy baking parchment paper
How to Make It
- Melt pure beeswax in a safe double boiler until fully liquid, maintaining a low temperature around 60°C (140°F).
- Fill small water balloons with cool water to the size of a large orange.
- Guide the child’s hands to hold the knotted top of the water balloon and dip the base 2 inches deep into the liquid wax for 2 seconds.
- Lift the balloon out, hold it in the air for 10 seconds to allow the wax skin to cool and solidify, and repeat 4 to 5 times to build a sturdy base.
- On the 4th dip, immediately sprinkle dried marigold petals across the tacky wax surface.
- Dip one final time into clear beeswax to seal the botanicals beneath a thin, protective wax layer.
- Place the balloon flat on parchment paper while the base is still slightly malleable to form a steady, level bottom.
- Once cold, snip the balloon neck over a sink, let the water drain, and slide the collapsed latex out from inside the wax vessel. Place a battery-operated LED tea light inside.
Tips and Variations
- Never use open-flame candles; pair exclusively with soft-glow amber LED tea lights to maintain structural safety.
- Introduce dried lavender buds for a calming aromatherapeutic scent release when the vessel warms slightly.

5. Earth-Tone Sand Sensory Mosaics
Introduction
Moving beyond garish rainbow sands, this craft utilizes mineral sands, pulverized slate, terracotta dust, and crushed sea shells to build textural geometric art inspired by modern southwestern landscape architecture.
What This Idea Means
Sensory grain manipulation fosters finger strength and spatial organization. Children explore tactile contrast and geometric harmony using earth-toned mineral granules.
Materials Needed
- Natural sand in diverse geological tones (volcanic black, desert ochre, white quartz, terracotta red)
- Heavyweight cotton watercolor boards (8×10 inches)
- Child-safe liquid glue with fine-tip nozzles
- Flat soft-bristle watercolor brushes
- Shallow wooden sorting trays
How to Make It
- Draw clean, modern arch and horizon contours lightly with pencil onto the watercolor board.
- Have the preschooler paint liquid glue within a single pencil section using a small brush.
- Allow the child to pinch and sprinkle their chosen mineral sand over the glued region.
- Tilt the board over a tray to slide away excess loose grains, revealing clean, crisp sand-covered shapes.
- Repeat across adjacent sections with contrasting mineral tones until the landscape is fully filled.
- Let the completed mosaic dry flat for 4 hours.
Tips and Variations
- Introduce crushed eggshells or coarse sea salt into one section to add varied grit textures.
- Frame finished boards in unvarnished oak shadowboxes for an elevated gallery-wall presentation.

6. Eco-Dyed Silk Ribbon Garden Wands
Introduction
Using garden extracts like turmeric root, avocado pits, and eucalyptus leaves, children dye raw mulberry silk ribbons that dance gracefully on polished birch rods in the warm summer breeze.
What This Idea Means
This craft connects natural chemistry with dynamic movement. Toddlers see how kitchen staples and backyard botanicals create gentle earth tones, yielding active play items that celebrate outdoor movement.
Materials Needed
- 100% natural habotai silk ribbon strips (1 to 2 inches wide, 1 yard long)
- Smooth sanded birch dowel rods (12 inches long)
- Natural dye baths (boiled red cabbage, golden turmeric, crushed avocado stones)
- Small brass eyelet screws
- Unlacquered wooden rings
How to Make It
- Prepare dye baths ahead of time by simmering botanicals in water and letting them cool to lukewarm.
- Let the child submerge raw silk ribbons into individual dye pots, stirring with wooden spoons to watch colors shift.
- Soak ribbons for 30 minutes, then rinse in cool water and hang outside in the shade to dry.
- Screw a small brass eyelet into the tip of each wooden birch dowel.
- Help the preschooler thread their dyed silk ribbons through a small wooden ring and secure the ring to the eyelet.
- Take the ribbon wands into the garden for active, flowing play.
Tips and Variations
- Marble ribbons by loosely knotting sections before dipping into the dye bath to create organic resist patterns.
- Tie small brass bells to the dowel tip to incorporate delicate sound elements into outdoor play.


7. Sculptural Terracotta Pinch Pot Planters
Introduction
Pinch pots are an early childhood staple, but when executed with warm terracotta, hand-textured patterns, and planted with miniature succulents, they become sculptural centerpieces for patio tables.
What This Idea Means
Forming pinch pots directly develops the arch muscles of early learners’ hands. It instills an understanding of hollow forms, structural wall consistency, and organic symmetry.
Materials Needed
- Natural terracotta self-hardening or low-fire clay
- Assorted wooden patterning tools (notched sticks, burlap swatches, wooden forks)
- Small drainage hole punch (a wide drinking straw works perfectly)
- Well-draining potting soil
- Hardy miniature succulents or cuttings (e.g., jade, echeveria)
How to Make It
- Roll clay into a smooth, crack-free sphere roughly the size of an apple.
- Instruct the child to press their thumb smoothly down into the center, stopping roughly 1/2 inch from the base.
- Demonstrate rotating the ball while pinching the walls between the thumb and outer fingers with even, gentle pressure.
- Punch a clean drainage hole through the bottom using a wide straw.
- Let the child press burlap swatches or carved wooden sticks along the exterior walls to create geometric textures.
- Allow the planter to cure fully according to clay packaging specifications.
- Once hardened, help the preschooler add coarse gravel, potting soil, and plant a small succulent cutting.
Tips and Variations
- Leave the raw terracotta unsealed for a porous, matte, weathered Italian pottery feel.
- Layer small river pebbles across the soil surface around the plant to secure roots and keep the soil tidy.
8. Minimalist Sunburst Raffia Wall Hangings
Introduction
Layering natural woven raffia fibers around flat raw wood embroidery hoops creates sunburst wall hangings that soften modern living rooms, nurseries, and play spaces.
What This Idea Means
Looping and threading raffia strands develops bilateral coordination and bilateral finger dexterity. Children translate the visual idea of the summer sun into raw fiber geometry.
Materials Needed
- Natural unbleached raffia bundles
- 4-inch to 6-inch inner wooden embroidery hoops
- Child-safe blunt yarn needles
- Cotton macrame cord (3mm)
- Sharp crafting scissors (adult supervision)
How to Make It
- Cut raffia strands into uniform 8-inch segments.
- Fold a raffia bundle of 3 to 4 strands in half to form a loop.
- Guide the child to slip the loop beneath the wooden hoop, thread the loose ends through the loop (lark’s head knot), and pull gently outward.
- Continue knotting bundles around the full circle until the hoop is completely framed in a dense perimeter of natural fibers.
- Lay the sunburst flat and let the child assist in trimming the outer edges into an even halo.
- Fasten a subtle macrame loop at the top for wall display.
Tips and Variations
- Interweave a few strands of soft sage-green or muted terracotta yarn into the raffia for subtle color contrast.
- Unfurl and comb the raffia ends with a wooden wide-tooth comb to produce a feather-light texture.
9. Monochromatic Botanical Plaster Castings
Introduction
Preserving dimensional garden specimens by casting clay impressions in white plaster yields sculptural, stone-like botanical tiles that resemble classic gallery reliefs.
What This Idea Means
This craft teaches the fundamentals of positive and negative casting molds. Preschoolers learn how physical forms displace matter and leave three-dimensional imprints behind.
Materials Needed
- Fine modeling clay (plasticine or water-based sculpting clay)
- Plaster of Paris or casting stone powder
- Deep-profile disposable paper plates or cardboard casting collars
- Sturdy garden stems (rosemary, lavender, coneflower heads, sage leaves)
- Picture-hanging d-rings
How to Make It
- Roll clay flat into a 1-inch-thick disc at the bottom of a shallow paper plate.
- Have the child arrange sturdy stems and flower heads firmly onto the clay surface.
- Roll over the botanicals with a rolling pin, pressing them firmly into the clay bed.
- Carefully lift and remove all plant fragments with tweezers to reveal the crisp negative impression.
- Mix plaster with water according to instructions and pour smoothly over the clay mold.
- Press a picture-hanging ring gently into the setting plaster at the top edge.
- Allow the plaster to fully set for 60 minutes.
- Peel away the outer paper plate, detach the clay mold, and brush away any clay remnants under warm water to reveal the raised botanical plaster relief.
Tips and Variations
- Sand the outer perimeter of the plaster tile for an intentional, raw-edged chiseled stone finish.
- Lightly brush the raised details with diluted raw umber paint, wiping it back immediately with a cloth to antique the crevices.
10. Textured River Stone Stacking Totems
Introduction
Balanced stone cairns have grounded outdoor landscapes for centuries. In this mindful art activity, preschoolers paint river stones with matte, mineral pigments and bond them into serene stacking sculptures.
What This Idea Means
Balancing and arranging stone totems builds understanding of center of gravity, geometric sorting, and spatial mass. It turns pebble collection into an intentional, meditative exercise.
Materials Needed
- Flat, smooth natural river stones of graduated sizes
- Matte mineral or chalk paints (linen white, warm gray, dusty clay, charcoal)
- High-strength child-safe clear craft adhesive or silicone glue (applied with adult assistance)
- Flat nylon craft brushes
How to Make It
- Wash gathered river stones in warm water and let them dry completely in the sun.
- Have the child paint simple geometric bands, dots, or monochrome half-dipped color fields onto individual stones.
- Allow the painted stones to dry completely.
- Encourage the child to test different balancing orientations, stacking largest to smallest to discover stability principles.
- Assist the child in applying a bead of structural adhesive between each balanced stone tier.
- Let the finished stone totem cure undisturbed for 24 hours.
Tips and Variations
- Leave some stones in their raw, unpainted state to emphasize the contrast between natural stone textures and clean painted lines.
- Add a flat felt base underneath the lowest stone to protect wood tabletop surfaces.
11. Watercolor Bleed Japanese Paper Fans
Introduction
Crafted from bamboo frames and Japanese mulberry washi paper, these cooling hand fans combine traditional paper folding with the fluid magic of wet-on-wet watercolor blending.
What This Idea Means
Working with high-absorbency paper teaches liquid capillary action and color mixing. Children create functional summer tools used directly for outdoor cooling.
Materials Needed
- Unbleached Japanese washi paper or heavy mulberry paper
- Natural bamboo fan ribs or wide wooden craft sticks
- Liquid watercolors in harmonious tones (ocean teal, soft gold, seafoam)
- Pipettes or natural round watercolor brushes
- Child-safe glue sticks
How to Make It
- Cut washi paper into a wide semicircular or rectangular fan template.
- Wet the entire paper surface lightly with a sponge dipped in clean water.
- Let the child drop small beads of liquid watercolor across the wet surface, observing the soft, feathery blooms of color.
- Allow the paper to air-dry completely on a flat drying rack.
- Guide the preschooler to accordion-fold the dried paper in crisp 1-inch intervals.
- Fasten the bottom folded segment tightly and secure it between two wooden handle sticks using non-toxic craft glue.
- Open the fan ribs outward to expand the pleated canopy.
Tips and Variations
- Sprinkle coarse rock salt onto the wet watercolor paint and brush it off once dry to produce organic crystal burst textures.
- Use a single color wash at varying water dilutions to explore subtle monochromatic gradients.
12. Floating Botanical Ice Sculptures
Introduction
Capturing freshly clipped garden greenery, citrus wheels, and delicate petals in frozen crystal-clear discs creates temporary outdoor garden installations that melt gracefully in the summer heat.
What This Idea Means
This craft provides an interactive thermal science experience. Preschoolers explore freezing and melting points, buoyancy, and changing light refractions through temporary art.
Materials Needed
- Shallow circular cake pans or silicone tart molds
- Distilled water (boiled and cooled twice for optical clarity)
- Fresh garden botanicals (pansies, mint leaves, lavender stems, sliced lemons)
- Heavy natural jute twine
How to Make It
- Pour a 1/2-inch layer of distilled water into the base of the mold.
- Let the preschooler arrange petals and citrus slices face down in the shallow water.
- Freeze this initial layer for 2 hours to lock the botanicals firmly in place.
- Loop a length of jute twine into the mold with the loose ends resting inside the water, creating a hanging anchor.
- Pour a second layer of cold water over the frozen botanicals to fill the mold completely, and return to the freezer overnight.
- Briefly run lukewarm water over the base of the mold to release the ice disk.
- Hang the ice suncatcher from an outdoor tree branch in the garden and watch it catch the morning light as it slowly melts.
Tips and Variations
- Hang these near bird-feeding stations with birdseed frozen into the outer rim for a functional wildlife feeder.
- Place a shallow ceramic bowl beneath the hanging sculpture to catch melting petals for extended water-play sensory exploration.
13. Minimalist Hand-Stitched Canvas Beach Totes
Introduction
Using heavyweight unbleached cotton canvas totes, blunt wooden needles, and chunky linen threads, early learners practice introductory embroidery by stitching geometric sunshine silhouettes.
What This Idea Means
Sewing builds fine-motor precision, pincher grasp strength, and hand-eye balance. Children create durable, functional bags they can proudly carry on outings.
Materials Needed
- Heavy unbleached cotton canvas tote bags
- Chunky natural linen, jute, or muted cotton yarn
- Large blunt-tip tapestry or wooden yarn needles
- Wooden embroidery hoop (7 or 8 inches)
- Fabric pencil or water-erasable fabric marker
How to Make It
- Stretch a flat section of the canvas tote securely inside the wooden embroidery hoop.
- Draw large, simple dash lines forming a minimalist sun arch or sailboat silhouette on the canvas.
- Pre-punch needle holes along the pencil marks using a standard awl (adult step).
- Thread the blunt tapestry needle with thick linen yarn and knot the far end.
- Guide the preschooler’s hands through an up-and-down running stitch following the pre-punched guide points.
- Unclamp the embroidery hoop once the design is complete and tie off the interior yarn ends securely.
Tips and Variations
- Incorporate large, flat unfinished wooden beads onto the stitch lines to add tactile elements.
- Pre-stamp geometric shapes using sliced apples and fabric ink before stitching over the printed contours.
14. Modern Wooden Bead & Macrame Trivets
Introduction
Geometric unfinished wooden beads strung on durable macrame cord form sturdy, Nordic-inspired hot pads that protect kitchen tables from warm serving dishes and summer teapots.
What This Idea Means
Threading sturdy spherical beads reinforces numeric sequencing, pattern reproduction, and spatial tension control while creating practical culinary home goods.
Materials Needed
- Assorted raw unfinished geometric and round wooden beads (20mm to 25mm diameter)
- 4mm braided unbleached cotton macrame cord
- Child-friendly wooden threading needle or tape-wrapped cord ends
- Heavy craft scissors
How to Make It
- Wrap the tip of the macrame cord tightly with masking tape to create a firm, easy-to-thread aglet.
- Allow the child to thread wooden beads onto the cord in repeating geometric patterns (e.g., round, faceted, round).
- Thread approximately 24 to 30 large beads onto a continuous cord.
- Form the beaded strand into a tight flat spiral or continuous interlocking ring.
- Secure the ends firmly with a double square knot, tucking the loose cord tails back inside adjacent beads.
Tips and Variations
- Dip half of the wooden beads in non-toxic milk paint (in sage or linen) before stringing for clean two-tone contrast.
- Make miniature versions using fewer beads to serve as matching modern drink coasters.


15. Sun-Etched Wooden Botanical Coasters
Introduction
Harnessing botanical stencils and non-toxic solar-reactive wood finishes, children design natural basswood coasters permanently etched by the summer sun.
What This Idea Means
This craft introduces solar reactivity on wood grain surfaces. Children see how focused sunlight creates distinct value contrasts without synthetic paints.
Materials Needed
- Round natural basswood tree slices with intact bark edges
- Heavy botanical cardstock stencils (fern leaves, palm silhouettes)
- Non-toxic sunlight-reactive wood stain or water-thinned walnut ink
- Foam sponge brushes
- Clear matte butcher block oil
How to Make It
- Lightly brush the surface of the raw wooden slice with a thin coat of solar-reactive wood finish.
- Place the heavy botanical stencil firmly onto the center of the damp wood slice.
- Place the piece in bright direct sunlight for 20 to 40 minutes while the exposed wood gently deepens in tone.
- Remove the stencil to reveal the crisp, pale silhouette of the botanical shape beneath.
- Seal the finished wood coaster with non-toxic butcher block oil to enrich the grain and provide moisture resistance.
Tips and Variations
- Use pressed real leaves pinned flat with tiny sewing pins instead of paper stencils for authentic, organic outlines.
- Tie sets of four matching coasters together with a strip of raw leather cord for an elegant gift presentation.
16. Sculptural Seashell Memory Jars
Introduction
Transforming collected coastal treasures into elegant keepsakes, this project uses smooth white plaster paste to anchor delicate scallop shells and sea urchin tests onto frosted glass apothecary vessels.
What This Idea Means
Preschoolers explore sculptural adhesion, surface texture mapping, and spatial placement while preserving physical memories from summer beach trips.
Materials Needed
- Smooth frosted glass jars or clean cylindrical ceramic canisters
- White mineral modeling paste or air-dry ceramic compound
- Clean, sun-dried seashells, smooth sea glass, and miniature starfish
- Small wooden craft spatulas
How to Make It
- Let the child clean and dry their gathered coastal treasures.
- Spread a 1/4-inch-thick layer of white modeling paste across the exterior of the jar using a small wooden spatula.
- Encourage the child to press shells, sea glass, and small stones firmly into the soft paste in an organic arrangement.
- Smooth any excess paste around the shell borders with a damp fingertip or brush.
- Allow the vessel to cure undisturbed for 24 to 36 hours until the paste hardens into a chalky stone finish.
Tips and Variations
- Keep the shells grouped in a single dense band around the base of the jar for a clean, minimalist profile.
- Use the finished jar to hold writing utensils, paintbrushes, or dried wildflower bouquets.
17. Hand-Rolled Beeswax Honeycomb Candles
Introduction
Crafting table candles using textured sheets of 100% pure honeycomb beeswax requires no heat or hot wax, making it an accessible, aromatic craft for preschoolers.
What This Idea Means
Rolling flat wax sheets builds bilateral palm coordination, steady pressure control, and sensory appreciation for natural textures and sweet honey aromas.
Materials Needed
- Natural honeycomb beeswax foundation sheets (in natural golden amber, muted sage, and cream)
- 100% braided cotton candle wicking (#2 or #3 size)
- Child-safe clay modeling blades or small craft rulers
- Soft hairdryer (optional, to gently warm cool wax sheets)
How to Make It
- Lay a sheet of beeswax flat on a clean wooden tabletop.
- Cut a length of braided cotton wick 3/4-inch longer than the height of the wax sheet.
- Place the wick along the leading edge of the wax sheet.
- Show the preschooler how to gently fold the wax edge over the wick, pressing down firmly along the entire length to lock it in place.
- Guide the child to roll the wax sheet forward with open, flat palms, applying even, gentle pressure so the cylinder stays straight and compact.
- Press the final wax seam firmly against the candle body to secure the edge.
Tips and Variations
- Cut the wax sheet diagonally before rolling to produce tapered spiral candles.
- Wrap a small band of raw linen fabric and a sprig of dried lavender around the center of the finished candle for display.
18. Hanging Garden Clay Herb Markers
Introduction
Hand-stamped ceramic markers bring clarity and visual charm to outdoor vegetable gardens and windowsill herb boxes. Preschoolers stamp herb names into durable clay shapes using wooden typesets.
What This Idea Means
This craft connects early letter recognition and spelling with gardening. Children practice linear letter alignment while producing practical gardening labels.
Materials Needed
- White exterior-grade air-dry clay or polymer clay
- Vintage wooden typography letter stamps
- Fresh garden herb sprigs (thyme, rosemary, mint)
- 16-gauge copper garden wire
- Fine-tip awl or bamboo skewer
How to Make It
- Roll clay into 1/2-inch-thick rectangular strips or rounded garden stake paddles.
- Let the child select the correct letter stamps for herb names (like “MINT”, “ROSEMARY”, or “SAGE”).
- Guide the child to press each letter firmly into the clay surface in order.
- Press a real sprig of the corresponding herb into the base of the clay marker to leave a botanical impression.
- Punch a neat hole through the top of the marker using a bamboo skewer.
- Allow the clay to cure completely according to packaging instructions.
- Thread a 6-inch loop of copper wire through the top hole so the marker can hang from garden stakes or pot rims.
Tips and Variations
- Leave the raw stamped letters clean and unpainted, or dab natural mineral pigment into the stamped grooves for clear legibility.
- Cut markers into clean pennant or banner shapes for a tailored aesthetic.
19. Woven Summer Grass Coasters
Introduction
Weaving wild sweetgrass, rushes, or raffia around flat circular looms introduces preschoolers to traditional textile basketry techniques using fragrant, flexible summer grasses.
What This Idea Means
Radial weaving develops fine-motor concentration, over-under sequencing, and tactile agility. It turns garden grass clippings into sturdy woven tableware.
Materials Needed
- Heavy circular cardboard weaving looms (5 inches in diameter, pre-notched around the perimeter)
- Sturdy cotton warp string (unbleached)
- Flexible gathered summer sweetgrass, rushes, or natural raffia
- Large blunt plastic or wooden tapestry needles
How to Make It
- Warp the circular cardboard loom with cotton string, crossing through the center point to create an odd-numbered starburst pattern.
- Thread a blunt needle with flexible, damp sweetgrass or raffia strands.
- Guide the child to weave the needle over and under the warp strings in a continuous outward spiral from the center hub.
- As one grass strand ends, tuck in a new strand and continue the continuous spiral pattern.
- Once the weaving reaches the outer edge of the cardboard loom, carefully unhook the warp loops from the notches.
- Tie adjacent warp loops together in pairs to secure the outer edge of the coaster.
Tips and Variations
- Soak fresh grasses in warm water for 10 minutes beforehand to keep them flexible and prevent snapping during weaving.
- Combine dried fragrant sweetgrass with linen thread for a calming herbal aroma whenever warm cups rest on the coaster.
20. Natural Indigo Resist-Dyed Linen Napkins
Introduction
Using gentle Japanese Shibori folding techniques with child-friendly vegetable indigo vats, preschoolers create deep blue and crisp white geometric patterns on natural cloth table linens.
What This Idea Means
Folding, clamping, and dipping fabric teaches geometry, compression resist dynamics, and natural oxidation. Children watch the dye transform from yellow-green to deep indigo right before their eyes.
Materials Needed
- 100% natural cotton or pure linen dinner napkins
- Non-toxic organic pre-reduced indigo vat kit
- Smooth wooden craft blocks (squares, triangles, and circles)
- Heavy-duty rubber bands or child-safe wood clamps
- Sturdy wooden stirring sticks and safety wash basins
How to Make It
- Teach the preschooler to accordion-fold a clean, damp linen napkin into a compact triangle or square.
- Sandwich the folded fabric tightly between two identical wooden shapes.
- Secure the wood blocks firmly using multiple tight rubber bands.
- Assist the child in lowering the clamped bundle into the indigo dye vat, keeping it submerged for 3 to 5 minutes.
- Lift the bundle out of the vat; it will appear bright yellow-green.
- Watch together as exposure to outdoor oxygen turns the fabric a rich Prussian blue over the course of 10 minutes.
- Snip the rubber bands, remove the wooden blocks, and unfold the napkin to reveal crisp white geometric resist patterns against the deep blue background.
- Rinse thoroughly in cold water until the water runs clear, then hang to dry.
Tips and Variations
- Use round wooden marbles bound with rubber bands to create circular tie-dye patterns.
- Wash the finished linens with a gentle pH-neutral soap to preserve rich indigo tones across years of everyday use.


