Spread the love

Spring break is the perfect season to slow down, clear off the kitchen table, and spark your children’s creative imaginations. Moving away from standard neon paper crafts, this curated collection focuses on soft pastel palettes, tactile natural materials, warm textures, and timeless aesthetic designs. These projects are crafted to engage kids of all ages while yielding beautiful, display-worthy creations you will genuinely love showcasing around your home.
1. Botanical Clay Pressed Coasters

What This Idea Means

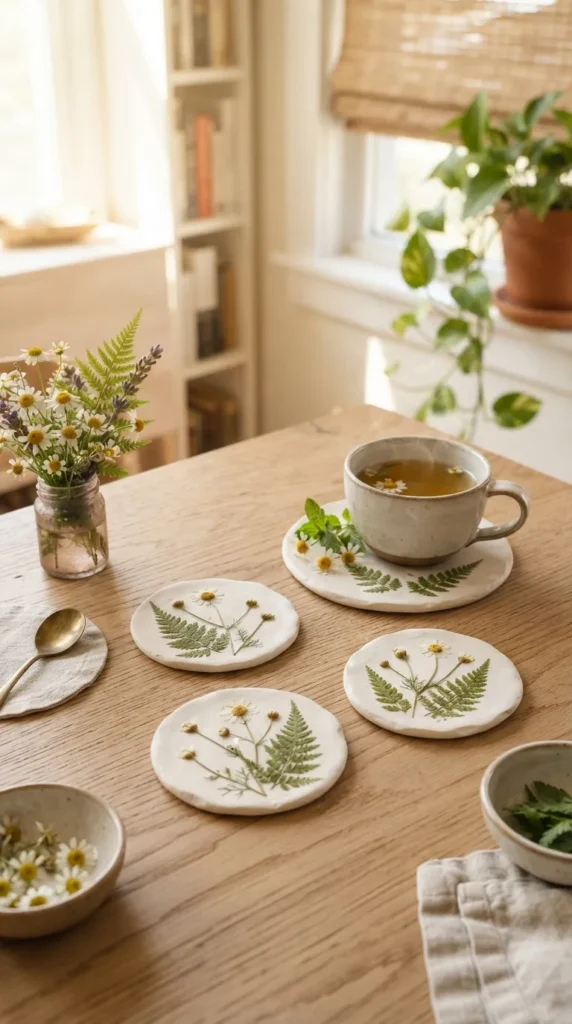
Botanical clay coasters bring a touch of early spring gardens right onto your coffee table. By pressing real, delicate flowers and leaves into smooth air-dry clay, kids create functional art that captures the transient beauty of fresh floral blooms.

Materials Needed

  • Air-dry clay (white or soft ivory)
  • Freshly picked small flowers, petals, and fern fronds
  • Wooden rolling pin
  • Circular cookie cutter or rim of a glass
  • Mod Podge or clear matte acrylic sealant
  • Fine-grit sandpaper

How to Make It

  1. Knead a palm-sized portion of air-dry clay until warm and pliable.
  2. Roll the clay out on a smooth surface to roughly a $1/4$-inch thickness.
  3. Gently arrange small, fresh blooms or leaves face-down onto the rolled clay surface.
  4. Carefully roll over the flowers once with medium pressure to imprint the textures.
  5. Peel away the botanical elements using tweezers or fingers.
  6. Use your circular cutter to stamp out the coaster shape.
  7. Allow the clay to dry for 24 to 48 hours, flipping once halfway through.
  8. Gently smooth the edges with sandpaper and apply a protective coat of matte sealant.

Tips and Variations

Pro Tip: Keep floral arrangements minimal—one striking botanical spray often looks more modern and aesthetic than a crowded collection.

  • Variation: Add a single drop of liquid watercolors to the clay before kneading for a soft marble effect.

2. Dried Lavender & Pressed Flower Candles

What This Idea Means

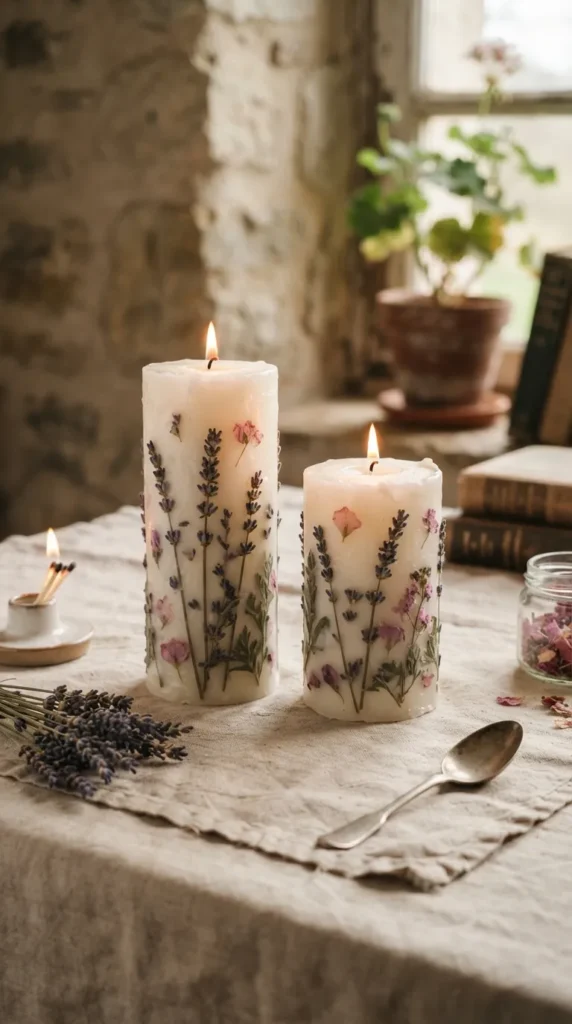
This project blends warmth and delicate scents. Children transform simple pillar or jar candles into whimsical garden showcases by adhering real pressed lavender stems and colorful flower petals directly to the wax surface.

Materials Needed

  • Plain white jar candles or pillar candles
  • Dried pressed flowers and lavender sprigs
  • Soy wax flakes or a small tea light candle
  • Dedicated craft paintbrushes
  • Small heat-safe dish

How to Make It

  1. Gently melt a few soy wax flakes or liquid wax from a small tea light into a heat-safe dish.
  2. Arrange pressed flowers and dried lavender against the exterior wall of your candle.
  3. Dip your paintbrush lightly into the melted wax and brush a thin layer directly over the pressed flowers to adhere them.
  4. Work smoothly around the candle circumference, overlapping petals to build depth.
  5. Allow the thin outer wax layer to set completely for 10 minutes.

Tips and Variations

Safety Note: Keep pressed botanical elements at least an inch below the candle wick line to ensure safe burning.

  • Variation: Apply this exact process to electric flame-less LED pillar candles for completely worry-free kid room decor.

3. Pastel Sun-Catcher Crystal Window Drops

What This Idea Means

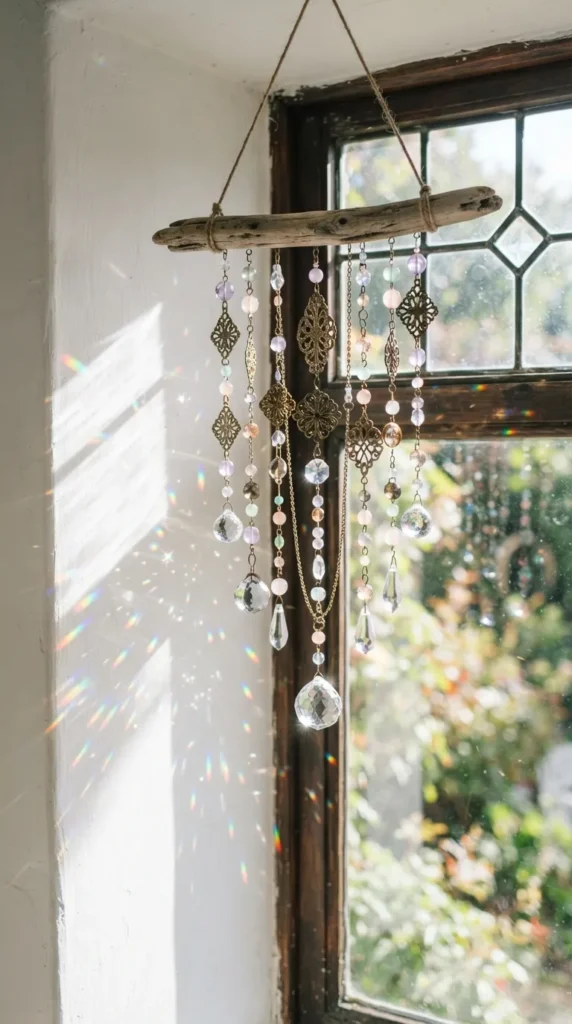
When spring sunlight filters through the windows, these pastel sun-catchers cast breathtaking rainbows and muted color hues across the floor, giving children a magical daily light show.

Materials Needed

  • Faux crystal prisms or glass beads
  • Translucent pastel pony beads (blush pink, sage green, soft lavender, buttercream)
  • Clear jewelry monofilament thread or flexible wire
  • Small wooden craft hoops or driftwood branches
  • Scissors

How to Make It

  1. Cut a string of clear monofilament thread to approximately 18 inches long.
  2. Tie a firm double knot around the bottom of your main glass prism or crystal drop.
  3. String pastel beads in alternating patterns, leaving small spaces between cluster patterns.
  4. Tie the finished strand securely onto a central wooden craft hoop or a piece of beach driftwood.
  5. Create 3 to 5 matching strands of varying lengths and attach them to the frame.
  6. Hang near a bright, sunny window sill.

Tips and Variations

Pro Tip: Use natural driftwood found during spring beach or woodland walks to give the project an earthy, balanced frame.

  • Variation: Integrate small wooden beads between the pastel glass beads for added natural texture.

4. Aesthetic Pressed Flower Bookmark Ribbons

What This Idea Means

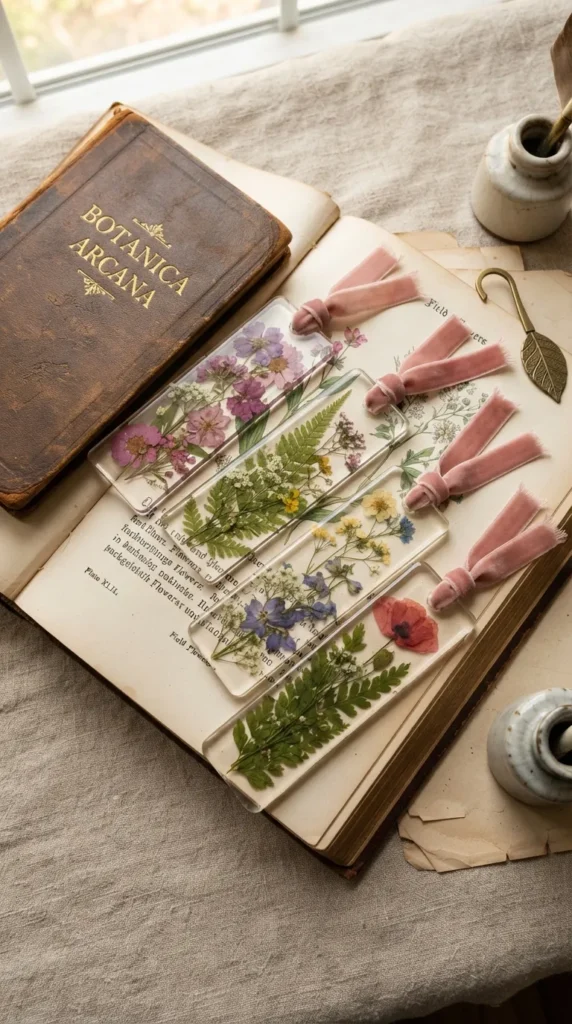
Elevate daily reading with elegant bookmarks made from clear laminate sheets, pressed wildflowers, and silky velvet ribbons. They make charming hand-crafted gifts for friends and family.

Materials Needed

  • Self-adhesive laminating sheets or clear contact paper
  • Delicate pressed flowers and thin foliage
  • Velvet or satin ribbon (earth tones or dusty pastels)
  • Hole puncher
  • Paper trimmer or scissors

How to Make It

  1. Cut two matching rectangles from clear contact paper ($2 \times 6$ inches).
  2. Peel off the protective backing of one rectangle and lay it sticky-side up on the table.
  3. Let kids lay down pressed blossoms, ferns, and tiny stems in an aesthetic arrangement.
  4. Gently press the second adhesive sheet directly down onto the design, smoothing out air bubbles from the center outward.
  5. Trim the edges cleanly, punch a single hole at the top center, and thread through a 6-inch strand of soft velvet ribbon.

Tips and Variations

Pro Tip: Use a credit card or flat edge to firmly smooth out any tiny air bubbles before trimming your edges.

  • Variation: Write a short handwritten quote or name using a metallic fine-liner pen directly onto the clear plastic before sealing.

5. Terracotta Pot Clay Mushroom Village

What This Idea Means

Miniature clay mushroom gardens built atop inverted terracotta pots transform any windowsill or patio into a fairy-tale corner. Kids can sculpt personalized toadstool tops that radiate rustic charm.

Materials Needed

  • Miniature terracotta pots ($2\text{–}3$ inches high)
  • Air-dry clay or polymer clay
  • Acrylic craft paint (dusty terracotta, cream, muted moss green, soft mauve)
  • Craft sponge and detail paintbrushes
  • Strong craft glue or hot glue (adult help required)

How to Make It

  1. Turn terracotta pots upside down to serve as the mushroom stems.
  2. Sculpt mushroom caps out of air-dry clay, making them slightly wider than the base of the terracotta pots.
  3. Form small, organic grooves on the underside of the clay caps to mimic real mushroom gills.
  4. Let the clay cure completely until solid.
  5. Paint the terracotta bases and clay caps using soft, muted pastel and earthy tones.
  6. Accent the caps with small off-white dots using the tip of a paintbrush handle.
  7. Glue the dried caps firmly onto the bottoms of the upside-down pots.

Tips and Variations

Pro Tip: Mix a pinch of sand into your acrylic paint to create an authentic matte, stone-like texture.

  • Variation: Glue real preserved sheet moss around the base of the pot stems for added realism.

6. Hand-Painted Ceramic Egg Cups

What This Idea Means

Celebrate spring morning breakfasts with custom-painted ceramic egg cups. This activity lets kids express their artistic style on functional table decor using soft botanical motifs or minimalist strokes.

Materials Needed

  • Plain white ceramic egg cups
  • Multi-surface or ceramic acrylic paints (pastel palettes)
  • Fine-tip detail paintbrushes
  • Matte varnish (food-safe sealant for decorative outer edges)

How to Make It

  1. Clean ceramic egg cups thoroughly with rubbing alcohol and let dry.
  2. Guide kids to paint simple minimalist patterns: tiny daisies, soft gingham stripes, or delicate dots.
  3. Allow the paint to dry completely according to manufacturer instructions.
  4. Seal with a topcoat of brush-on ceramic varnish to protect the artwork.

Tips and Variations

Pro Tip: Keep paint layers thin to prevent running and maintain a crisp, clean aesthetic.

  • Variation: Use porcelain paint markers instead of brushes for younger children to give them better control.

7. Pastel Speckled Salt Dough Eggs

What This Idea Means

A cozy, old-school classic with an aesthetic upgrade: salt dough shaped into smooth easter eggs, painted in muted pastel shades, and flicked with dark brown paint for a realistic bird-egg look.

Materials Needed

  • 2 cups flour, 1 cup table salt, 1 cup warm water
  • Egg-shaped cookie cutter
  • Acrylic paint (duck egg blue, sage green, soft peach, cream)
  • Dark brown acrylic paint
  • Old toothbrush (for speckling)
  • Twine or cotton string

How to Make It

  1. Mix flour, salt, and water together to form a smooth dough.
  2. Roll dough out to $1/4$-inch thickness and cut out egg shapes.
  3. Straw-hole the top of each egg if you plan to hang them.
  4. Bake at $250^\circ\text{F}$ ($120^\circ\text{C}$) for $2\text{–}3$ hours until fully hardened, then cool completely.
  5. Paint eggs with solid coats of soft pastel colors.
  6. Dip a toothbrush into watered-down dark brown paint, flick the bristles with your thumb over the eggs to create subtle dark speckles.
  7. Thread twine through the top hole once dry.

Tips and Variations

Pro Tip: Do not rush the baking stage; low heat ensures the dough hardens flat without puffing up or cracking.

  • Variation: Stamp botanical leaves into the raw salt dough before baking for an embossed texture.

8. Woven Yarn & Branch Wall Hangings

What This Idea Means

Bringing the outdoors inside, kids collect sturdy fallen twigs, then weave natural cotton yarn, soft roving, and pastel ribbons across them to create bohemian wall hangings.

Materials Needed

  • Sturdy fallen tree branches (10 to 12 inches long)
  • Natural cotton macramé cord or thick yarn
  • Soft wool roving in earth and pastel shades
  • Tapestry needle or plastic yarn needle
  • Scissors

How to Make It

  1. Tie $6\text{–}8$ vertical strands of cotton yarn across a Y-shaped branch or straight stick to create your loom warp.
  2. Thread a blunt needle with pastel yarn or soft wool roving.
  3. Teach kids the simple “over-under” weaving pattern across the warp strands.
  4. Push rows upward gently to keep the weave snug and uniform.
  5. Add long hanging tassels to the bottom branch for extra texture.
  6. Tie a cotton string to both ends of the main top branch to hang on the wall.

Tips and Variations

Pro Tip: Varying the thickness of your yarn—combining chunky roving with thin cotton—creates rich visual texture.

  • Variation: Thread wooden beads onto select hanging fringe strands.

9. Pressed Fern & Floral Paper Lanterns

What This Idea Means

These warm, delicate paper lanterns glow softly on spring evenings. Made using tissue paper, real pressed foliage, and glass jars or wire frames, they make magical bedside lamps.

Materials Needed

  • Glass Mason jars or simple metal wire lantern frames
  • White or off-white tissue paper cut into squares or torn strips
  • Mod Podge or PVA glue diluted with water
  • Dried pressed fern fronds and leaves
  • Battery-operated flameless tea light candles

How to Make It

  1. Brush a thin layer of diluted PVA glue or Mod Podge over the exterior of a clean glass jar.
  2. Layer tissue paper strips over the jar, smoothing them flat with a wet paintbrush.
  3. Place pressed ferns and leaves over the first layer of tissue paper.
  4. Cover botanicals gently with another very thin layer of tissue paper and Mod Podge to lock them in place.
  5. Allow to dry thoroughly overnight until clear and firm.
  6. Drop a battery-operated LED tea light inside.

Tips and Variations

Pro Tip: Use torn tissue paper edges rather than straight cut edges for a softer, organic finish.

  • Variation: Use parchment paper rolled into cylindrical shapes for a glass-free, lightweight alternative.

10. Minimalist DIY Clay Bird Nests

What This Idea Means

Celebrating returning spring birds, children shape air-dry clay into rustic, organic bird nests filled with hand-sculpted clay eggs.

Materials Needed

  • Terracotta or natural white air-dry clay
  • Dried shredded raffia, moss, or twine bits
  • Acrylic paint (soft cream, robin-egg blue)
  • Craft glue

How to Make It

  1. Pinch a ball of air-dry clay into a small bowl shape.
  2. Texture the outside of the clay bowl using real twigs or crosshatch scoring tools to resemble interwoven twigs.
  3. Roll 3 to 4 tiny egg shapes out of remaining clay.
  4. Paint the eggs in soft pastel tones once cured; paint the nest in muted earthy browns.
  5. Glue bits of raffia or dried moss into the base of the nest, then nestle the clay eggs inside.

Tips and Variations

Pro Tip: Keep the clay bowl uneven and slightly imperfect—nature’s nests are wonderfully organic!

  • Variation: Use real tiny bird feathers tucked into the side of the clay nest.

11. Rustic Twig & Flower Fairy Wings

What This Idea Means

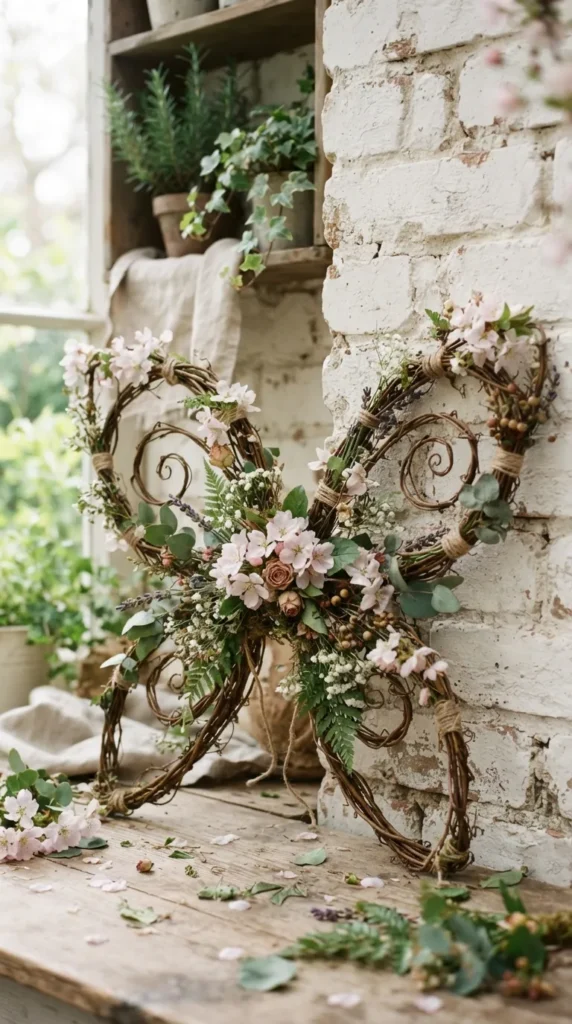
Ditching shiny plastic dress-up gear, this project invites kids to make rustic, earth-inspired fairy wings out of sturdy vines, thin flexible branches, and fresh spring flowers.

Materials Needed

  • Flexible willow branches or craft grapevine rings
  • Floral tape or jute twine
  • Sheer organza ribbon or soft tulle
  • Fresh or dried long-stemmed flowers
  • Scissors

How to Make It

  1. Bend two flexible branches into teardrop loop shapes to form top wing pairs.
  2. Make two smaller loops for lower wings and bind all four together at the center using strong jute twine.
  3. Wrap center joint tightly with floral tape or ribbon for stability and comfort.
  4. Weave flexible spring flower stems, greenery, and organza ribbon across the wing frames.
  5. Attach two soft elastic or ribbon loops to the center joint so kids can wear them over their shoulders.

Tips and Variations

Pro Tip: Use fresh greenery like eucalyptus stems as a base layer because it holds shape well without wilting quickly.

  • Variation: Wrap subtle fairy lights around the frame for evening play.

12. Soft Pastel Watercolor Coffee Filter Flowers

What This Idea Means

A dreamy, low-mess painting activity where coffee filters absorb pastel liquid watercolors, expanding into soft, ruffled blooms that look stunning gathered in a vase.

Materials Needed

  • Round white paper coffee filters
  • Liquid watercolors (lavender, soft rose, cream, sage)
  • Eye droppers or soft paintbrushes
  • Green floral tape and craft pipe cleaners
  • Tray or newspaper lining

How to Make It

  1. Flatten coffee filters and fold them into quarters or eighths.
  2. Dip or drop liquid watercolors onto the folded edges using droppers, letting the colors bleed naturally into one another.
  3. Unfold filters gently and lay flat to dry completely on a tray.
  4. Pinch the center of 3 to 4 dried filters together, twisting the base to form a fluffy flower head.
  5. Secure the base with green floral tape and wrap onto a pipe cleaner stem.

Tips and Variations

Pro Tip: Dilute watercolors with extra water to keep the finished shades soft, airy, and realistic.

  • Variation: Spritz finished flowers with a light mist of lavender essential oil spray for a scent element.

13. Earthy Fabric Scraps Spring Garland

What This Idea Means

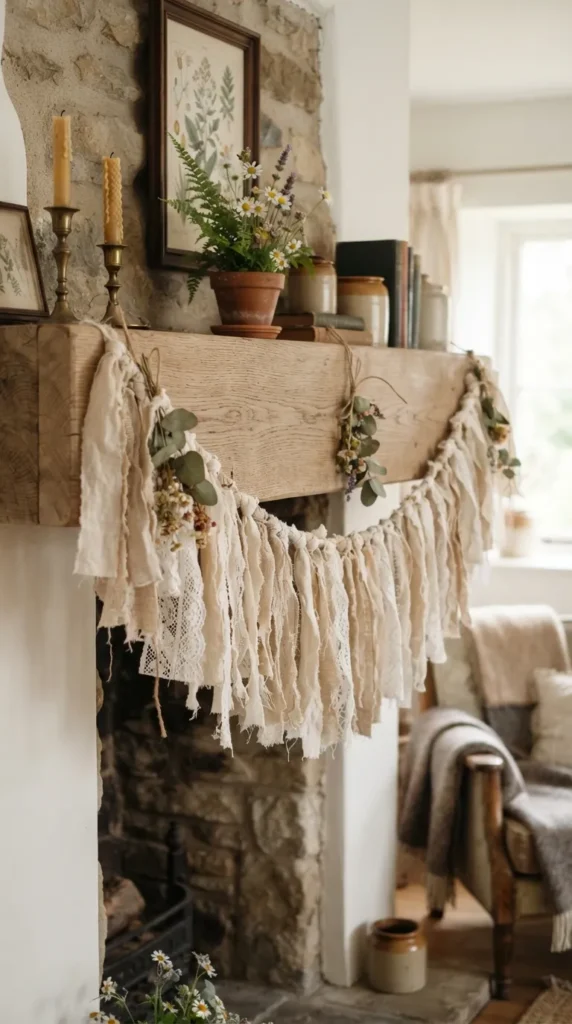
This eco-friendly craft turns leftover linen, cotton, and lace scraps into a charming, textured tassel garland that adds cozy cottagecore vibes to bedrooms or play spaces.

Materials Needed

  • Fabric scraps (linen, cotton, lace in creams, tans, sage, and muted pinks)
  • Long strand of sturdy jute twine or cotton rope
  • Fabric scissors

How to Make It

  1. Cut fabric scraps into uniform strips roughly $1\text{ inch wide} \times 10\text{ inches long}$.
  2. Lay your main jute rope flat along a table.
  3. Take a fabric strip, fold it in half to form a loop over the main rope, pull the ends through the loop (lark’s head knot), and pull snug.
  4. Alternate fabric textures, colors, and lace patterns along the entire length of rope.
  5. Trim any uneven bottom edges for a clean line, or leave raw for a rustic look.

Tips and Variations

Pro Tip: Mixing raw frayed edges with delicate lace strips creates a beautiful balance of rustic and refined textures.

  • Variation: Tie small dried flower bundles into every fifth knot along the garland.

14. Natural Dye Botanical Eggs

What This Idea Means

An educational and rewarding kitchen craft: dyeing hard-boiled white eggs using natural plant-based ingredients like red cabbage, turmeric, and onion skins to achieve gorgeous, earthy tones.

Materials Needed

  • Hard-boiled white eggs
  • Natural dye ingredients (red cabbage for blue, turmeric for yellow, red onion skins for terracotta)
  • White vinegar
  • Small cooking pots and strainers
  • Vegetable oil and soft cloth (for polish)

How to Make It

  1. Simmer your chosen botanical ingredient in water with 1 tablespoon of vinegar for 20 minutes to extract color; strain liquid into bowls.
  2. Submerge cool hard-boiled eggs into the natural dye bath.
  3. Leave eggs submerged in the refrigerator for 2 to 8 hours depending on color intensity desired.
  4. Remove eggs with a spoon and let dry on a rack.
  5. Rub a tiny drop of vegetable oil over dry shells with a soft cloth to impart a soft satin shine.

Tips and Variations

Pro Tip: Wrap small parsley or fern leaves tightly around eggs with nylon stockings before dyeing to leave natural white leaf silhouettes on the shell!

  • Variation: Use brown eggs instead of white eggs to produce deeper, warmer gem-toned shades.

15. Aesthetic Painted Wooden Bead Garden Stakes

What This Idea Means

Whimsical wooden plant stakes made by stacking hand-painted pastel wooden beads onto dowels. They add color and personality to potted plants and vegetable patches.

Materials Needed

  • Unfinished wooden beads (assorted sizes, $15\text{–}25\text{ mm}$)
  • Wooden craft dowels ($1/4$-inch thick)
  • Acrylic paints (soft terracotta, sage green, cream, mustard yellow)
  • Clear exterior sealer
  • Fine paintbrushes

How to Make It

  1. Thread wooden beads onto temporary toothpicks or spare wire to paint them easily.
  2. Paint beads with solid pastel coats, subtle stripes, or micro dots.
  3. Allow beads to dry completely, then seal with clear waterproof sealer.
  4. Slide painted beads onto a wooden dowel rod, applying a dab of wood glue between beads to secure them.
  5. Top with a final decorative oversized wooden bead or carved geometric shape.
  6. Press the stake into indoor potted plants or outdoor garden beds.

Tips and Variations

Pro Tip: Apply two thin coats of acrylic paint rather than one thick coat to keep bead surfaces smooth.

  • Variation: Write plant names (e.g., “Basil”, “Mint”) onto the center flattened bead using a fine-tip paint pen.

16. DIY Pressed Flower Clay Jewelry Dish

What This Idea Means

A lovely heirloom dish crafted from oven-bake or air-dry clay, stamped with real flowers, and trimmed with a refined metallic or pastel rim. Perfect for holding tiny trinkets.

Materials Needed

  • White air-dry or oven-bake polymer clay
  • Small pressed flowers or greenery
  • Rolling pin
  • Small oven-safe bowl (to shape dish)
  • Metallic gold paint or pastel rim paint

How to Make It

  1. Roll clay out into a flat circle roughly $1/4$-inch thick.
  2. Press dried flowers into the center of the clay disc, rolling lightly once over them.
  3. Remove foliage carefully to reveal the detailed impression left in the clay.
  4. Gently press the clay circle into the inside of a small bowl to give it curved dish edges.
  5. Bake or cure clay according to package directions.
  6. Once cool, paint the delicate outer rim of the dish with a thin accent stroke of gold or pastel paint.

Tips and Variations

Pro Tip: Coat the leaf impression with a tiny drop of translucent glaze to make botanical details pop.

  • Variation: Leave the pressed dried flower permanently embedded inside the clay and seal over it with clear resin or gloss glaze.

17. Botanical Pressed Fern Wall Scrolls

What This Idea Means

Crafting vintage-style botanical wall hanging scrolls using linen fabric, wooden dowels, and pressed fern fronds. A peaceful activity that results in gallery-ready bedroom art.

Materials Needed

  • Light beige linen or canvas fabric cut into rectangles ($8 \times 12$ inches)
  • Dried pressed fern fronds or large leaves
  • Half-round wooden dowel strips or magnetic poster frames
  • Fabric glue or Mod Podge
  • Hanging twine

How to Make It

  1. Lightly fray the side edges of your linen fabric for a vintage handmade feel.
  2. Glue pressed fern fronds flat onto the center of the linen panel using thin fabric glue.
  3. Let the glue set flat under a heavy book for 1 hour.
  4. Sandwich or glue the top and bottom edges of the fabric between wooden dowel strips.
  5. Tie cotton twine across the top dowel to hang up.

Tips and Variations

Pro Tip: Iron your linen fabric beforehand so it lays completely flat before attaching botanicals.

  • Variation: Stamp vintage botanical typography or latin leaf names under the fern using rubber alphabet stamps.

18. Cute DIY Moss & Driftwood Fairy Doors

What This Idea Means

Tucked against baseboards or tree roots, these miniature handcrafted wooden fairy doors spark imaginative storytime throughout spring break.

Materials Needed

  • Craft Popsicle sticks or thin natural wood slats
  • Preserved sheet moss and tiny bark pieces
  • Acrylic paint (faded teal, muted olive, warm ivory)
  • Wood craft glue
  • Small brass Brad pins or mini metal beads (for door handles)

How to Make It

  1. Align 5 to 6 wooden craft sticks vertically and glue two cross-braces across the back to make a wooden door panel.
  2. Cut the top into an arch shape using heavy craft shears.
  3. Paint the door in a soft cottage color and let dry.
  4. Push a small brass brad pin into one side to serve as a vintage door handle.
  5. Glue preserved green moss and tiny bark strips along the outer frame edges.
  6. Place at the base of an indoor houseplant or outdoors against a garden tree trunk.

Tips and Variations

Pro Tip: Sand the edges of the painted wooden door lightly with fine sandpaper to create an authentic distressed vintage look.

  • Variation: Construct a tiny twig archway extending outward over the top of the door frame.

19. Chic Marbled Pastel Paper Art

What This Idea Means

Using simple shaving cream and liquid food coloring or watercolor paint, kids can create breathtaking marbled paper sheets with high-end swirl patterns perfect for card-making or framing.

Materials Needed

  • Unscented foam shaving cream
  • Liquid food coloring or liquid watercolors (pastels: mint, lilac, soft yellow)
  • Heavy cardstock paper sheets
  • Baking sheet or flat tray
  • Ruler or plastic scraper card

How to Make It

  1. Spread an even 1-inch layer of shaving cream across a baking tray.
  2. Drip drops of pastel liquid colors across the surface of the foam.
  3. Drag a toothpick or skewer across the drops in gentle figure-eight motions to swirl colors together.
  4. Press a piece of thick cardstock paper firmly down onto the swirling foam surface for 5 seconds.
  5. Lift the paper up and use a ruler to scrape off all excess shaving cream in one smooth motion.
  6. Reveal the crisp marbled dye pattern underneath and let dry flat.

Tips and Variations

Pro Tip: Don’t over-mix the shaving cream surface—fewer swirls keep the individual pastel colors crisp and distinct.

  • Variation: Use the marbled paper as background backing inside clear floating picture frames.

20. Aesthetic Woven Yarn Daisy Coasters

What This Idea Means

Cute, cozy retro-inspired coasters shaped like spring daisies, created using simple yarn wrapping techniques around cardboard weaving templates.

Materials Needed

  • Sturdy cardboard cut into 4-inch circles
  • Soft cotton yarn (white or cream for petals, warm yellow for centers)
  • Tapestry needle
  • Scissors

How to Make It

  1. Cut 12 small, evenly spaced slits around the perimeter of a cardboard circle.
  2. Wrap yellow yarn through the center holes to create a round daisy center core.
  3. Weave white or cream cotton yarn in radiating loops through the outer slots around the center to form rounded flower petals.
  4. Tie off ends neatly on the backside of the cardboard frame.
  5. Trim any excess threads for a clean, aesthetic coaster finish.

Tips and Variations

Pro Tip: Use thick, plush cotton yarn for quick weaving progress and extra-soft finished coasters.

  • Variation: Connect several yarn daisies together in a row to create an aesthetic table runner.