Spread the love

Transforming a child’s creative chaos into an organized, inspiring haven is one of the most rewarding home organization projects you can undertake. A dedicated kids’ arts and crafts cabinet does more than just clear up floor clutter—it acts as an invitation to create, fueling imagination while teaching valuable lifelong habits of tidiness and respect for materials. When your supplies are thoughtfully categorized, easily accessible, and visually inviting, children are far more likely to independently initiate projects, clean up after themselves, and explore new mediums without feeling overwhelmed.

Designing this space requires balancing practicality with enchantment. Cabinets must be sturdy enough to withstand enthusiastic daily use, low enough for little hands to reach safely, and clever enough to house everything from bulky tubs of modeling clay down to the tiniest glitter shakers. Whether you are repurposing an old kitchen pantry, transforming a freestanding wardrobe, or building custom built-in shelving, the secret lies in strategic compartmentalization. By organizing supplies by function—such as drawing, cutting, sculpting, and painting—you create distinct zones that make setup and teardown seamless.

Beyond sheer functionality, an arts and crafts station should feel magical. Incorporating warm lighting, playful labels, color-coded bins, and charming textural elements turns a simple storage piece into a centerpiece of inspiration. Throughout this guide, you will explore twenty distinct, aesthetically stunning craft cabinet organization systems complete with step-by-step instructions, essential supply lists, expert tips, and creative variations tailored to fit any home decor style. Let’s dive into these twenty gorgeous concepts designed to elevate your creative space.

1. The Pastel Rainbow Rolling Cart Integration

A pastel rainbow rolling cart paired with a neutral wooden cabinet creates an effortlessly mobile and visually soothing art station. This setup categorizes supplies across tiers by color and medium, allowing children to wheel their active projects anywhere in the house.

  • How to Make It: Start with a sturdy white or light birch wooden cabinet. Inside the cabinet, house a three-tier metal utility cart painted in soft pastel shades of mint, lavender, and peach. Assign the top tier to frequent-use drawing tools, the middle tier to crafting papers, and the bottom tier to heavier supplies like clay tubs. Install matching pastel storage cups on the cabinet doors using magnetic or adhesive mounting brackets to maximize vertical space.
  • Tips and Variations: Use clear acrylic lazy susans on the shelves to ensure easy spinning access to markers and colored pencils without knocking over adjacent items. For a bohemian twist, swap pastel metals for woven rattan baskets and a natural wood-toned cart.
  • Supplies Needed: Wooden storage cabinet, 3-tier pastel utility cart, clear acrylic turntable organizers, pastel marker cups, adhesive mounting strips.
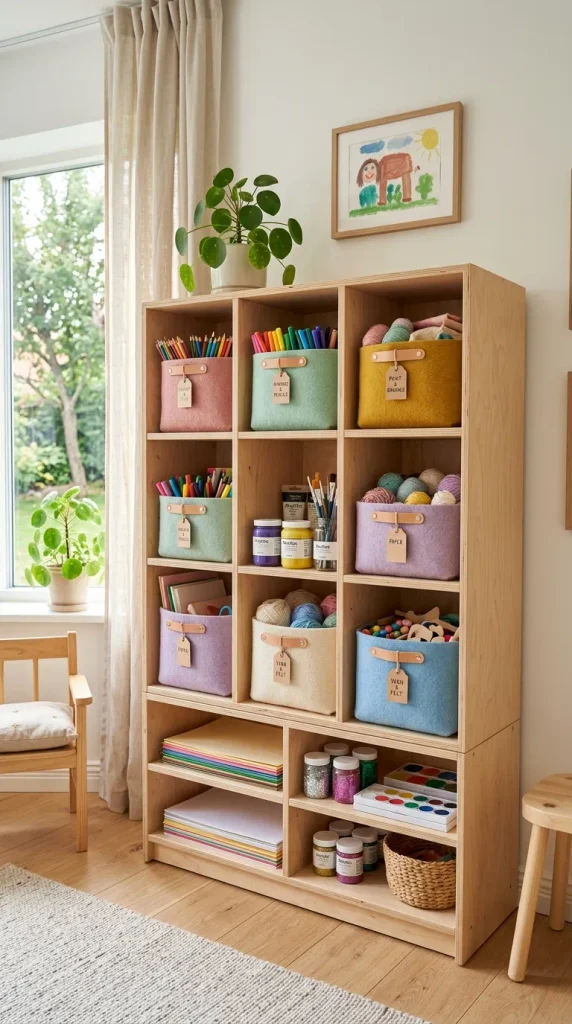
2. The Minimalist Scandinavian Birch Cubby System

Emphasizing clean lines, warm natural wood, and uncluttered surfaces, this Scandinavian-inspired design uses open birch cubbies paired with matching felt storage bins to keep visual noise to an absolute minimum.

  • How to Make It: Select a modular birch plywood shelving unit that fits snugly inside your designated craft nook or cabinet frame. Fill alternate cubbies with custom-cut, heavy-duty wool felt storage boxes in heather gray and oatmeal. Dedicate the remaining open cubbies to display larger items like wooden weaving looms or sketchbooks stacked neatly upright.
  • Tips and Variations: Instead of traditional paper tags, attach small leather loops with embossed wooden letter tags to the felt bins for an ultra-chic, tactile labeling system. If your space receives direct sunlight, apply a matte UV-protective polyurethane finish to prevent the birch from yellowing over time.
  • Supplies Needed: Birch plywood cubby insert, wool felt storage boxes, leather scrap strips, wooden alphabet stamps, brass fasteners.

3. The Apothecary-Style Label Drawer Bank

Channeling vintage charm, this design utilizes a multi-drawer cabinet outfitted with antique brass cup pulls and custom-stamped cardstock labels to meticulously sort tiny crafting elements like beads, googly eyes, sequins, and brads.

  • How to Make It: Find a vintage or newly distressed apothecary-style chest of drawers that fits standard cabinet dimensions. Sort small-scale embellishments into clear glass or BPA-free plastic sorting trays that slide directly into each shallow drawer. Slide handwritten or stamped parchment labels into the front brass label holders of each drawer to identify contents instantly.
  • Tips and Variations: Line the interior base of each shallow drawer with patterned oilcloth or vintage sheet music for an unexpected pop of pattern every time a drawer is opened. For younger children who cannot yet read, attach small photographic icons of the supplies onto the label slots.
  • Supplies Needed: Multi-drawer apothecary cabinet, clear compartmentalized drawer inserts, antique brass label pulls, parchment cardstock, rubber stamp set.

4. The Pegboard-Lined Deep Cabinet Interior

Maximizing every square inch of vertical space, this concept transforms the inside doors and back panel of a deep storage cabinet into a modular pegboard wonderland where tools hang in precise alignment.

  • How to Make It: Cut finished hardboard or plywood pegboards to fit precisely against the interior back wall and inner doors of your large storage cabinet. Secure them with spacers to allow room for metal hooks. Hang specialized wire baskets, tool clips, and small wooden shelves directly onto the pegboard to hold scissors, hole punches, rulers, and rolls of washi tape.
  • Tips and Variations: Paint the pegboards a sophisticated sage green or warm terracotta to contrast sharply against white storage bins. Trace the outline of each tool directly onto the pegboard using a dark marker or vinyl decals to encourage natural “shadow-matching” cleanup habits for kids.
  • Supplies Needed: Hardboard pegboard panels, mounting spacers, assorted metal peg hooks, wire storage baskets, matte interior wall paint.

5. The Mason Jar Rotating Spice Rack Style Station

By repurposing wall-mounted or cabinet-integrated rotating spice organizers, this idea suspends rows of miniature glass jars filled with colorful craft embellishments, turning tiny supplies into a mesmerizing kaleidoscope of texture.

  • How to Make It: Install a heavy-duty multi-tier rotating tower or vertical spinning rack system onto the floor of a wide, shallow craft cabinet. Fill miniature, wide-mouth mason jars with sorted glitter, pom-poms, buttons, pipe cleaners, and wooden beads. Secure screw-on lids directly to custom wooden crossbars if building a custom revolving display tower.
  • Tips and Variations: Use plastic shatterproof jars instead of glass if your children are in their toddler or early elementary years to completely eliminate safety hazards. Tie small baker’s twine bows around the neck of each jar for an added handmade touch.
  • Supplies Needed: Rotating display tower base, mini wide-mouth jars with lids, baker’s twine, assorted craft embellishments, mounting hardware.

6. The BOHO Rattan and Woven Basket Haven

Bringing rich natural textures indoors, this cabinet design uses tightly woven seagrass, water hyacinth, and bamboo baskets to conceal messy supplies while infusing the room with a warm, earthy aesthetic.

  • How to Make It: Clear out interior cabinet shelving to accommodate varying heights of rectangular woven baskets. Assign one large seagrass basket for felt sheets, a medium lidded basket for yarn bundles, and shallow flat baskets for tracking painting pads. Attach minimalist wooden tags tied with jute twine to designate each basket’s category.
  • Tips and Variations: Line the interior of natural fiber baskets with unbleached cotton canvas liners to prevent delicate tissue paper or yarn fibers from snagging on rough woven edges. Mix different basket weaves—such as herringbone and braided styles—to add visual depth within a monochromatic color palette.
  • Supplies Needed: Assorted seagrass and water hyacinth baskets, cotton canvas basket liners, blank wooden gift tags, jute twine.

7. The Magnetic Chalkboard Door Storage Center

Merging organization with an active canvas, this approach equips cabinet doors with magnetic chalkboard inserts and hanging steel tins, giving kids a place to sketch ideas while keeping metal art tools securely stored.

  • How to Make It: Apply magnetic receptive primer followed by high-quality chalkboard paint directly onto the interior or exterior panels of your cabinet doors. Frame the painted panels with thin decorative trim molding. Hang galvanized steel utility tins from heavy-duty magnetic hooks stuck directly to the painted surface to hold chalk, magnets, and metallic markers.
  • Tips and Variations: Keep a small wooden box anchored to the bottom frame to catch chalk dust and hold felt erasers. Use liquid chalk markers in vibrant neon shades to write inspiring weekly art prompts or motivational quotes on the board surface.
  • Supplies Needed: Magnetic primer, chalkboard paint, decorative wood trim, galvanized steel hanging tins, heavy-duty magnetic hooks.

8. The Clear Acrylic Museum-Style Display Cabinet

Designed for families who appreciate pristine visual order, this concept treats art supplies like curated artifacts using crystal-clear acrylic bins, risers, and drawer sets that make inventory checks instantaneous.

  • How to Make It: Outfit a glass-paned cabinet or open-shelf bookcase with modular clear acrylic organizers of varying heights. Stack colored markers in tiered cosmetic organizers, store paint tubes upright in lipstick displays, and group sticker sheets in vertical file sorters. Ensure every item is visible from across the room.
  • Tips and Variations: Use clear rubber bumper feet on the bottom of acrylic bins to prevent sliding and scratching when enthusiastic children pull bins out quickly. Label the acrylic surfaces with sleek, minimal white vinyl transfer lettering for a clean, boutique-like finish.
  • Supplies Needed: Clear acrylic modular storage drawers, tiered cosmetic organizers, vertical file sorters, clear rubber bumpers, white vinyl letter stickers.

9. The Fabric Pocket Roll-Up Door Organizer

Utilizing soft textiles to soften a rigid wooden structure, this method hangs heavy canvas and denim pocket panels across the inside of cabinet doors, offering deep, flexible storage for odd-shaped supplies.

  • How to Make It: Sew a multi-tiered organizer panel using durable heavy-weight canvas or denim material, reinforcing stitch lines to hold weight. Insert wooden dowels through top and bottom hems to keep the fabric panel taut. Mount the finished hanging pocket organizer directly onto the interior surface of your large cabinet doors using secure upholstery brackets.
  • Tips and Variations: Color-block the pockets using different shades of dyed canvas to visually segment different supply types (e.g., indigo for painting tools, rust for cutting tools). Add clear vinyl windows to the front of deep pockets so children can peek inside without rummaging.
  • Supplies Needed: Heavy canvas fabric, wooden dowels, upholstery mounting brackets, clear vinyl sheeting, heavy-duty sewing thread.

10. The Dedicated Paper Sorting Station Tower

Paper is often the bulkiest and most easily ruined art supply; this custom vertical slot system keeps construction paper, cardstock, and watercolor pads crisp, flat, and sorted by hue.

  • How to Make It: Build or insert a custom vertical wooden sorter unit featuring thin, removable plywood dividers spaced two inches apart inside the lower section of your cabinet. Slide different weights and colors of paper horizontally or vertically into each dedicated slot, creating a gorgeous gradient color wall.
  • Tips and Variations: Install small LED strip lights along the top interior edge of the paper slot housing to illuminate the color gradient, making it feel like a professional art supply boutique. Label the base of each slot with color name tags using small metal label frames.
  • Supplies Needed: Plywood divider boards, wood glue, finishing nails, slim LED under-shelf strip lighting, metal label holders.

11. The Chalk-Painted Farmhouse Pantry Conversion

Transforming an old kitchen pantry into an art hub, this rustic farmhouse aesthetic features distressed wood finishes, wire mesh cabinet doors, and charming galvanized metal accents.

  • How to Make It: Sand down an old kitchen pantry cabinet and coat it in milk paint with a distressed finish along the edges. Replace solid wooden upper door panels with rustic chicken wire mesh or perforated metal grates. Line the interior shelves with butcher paper and arrange supplies inside galvanized metal utility buckets and enamelware basins.
  • Tips and Variations: Hang vintage galvanized clipboards on the inner door to hold blank coloring pages and stencils. Use old enamel soap dishes as resting trays for messy paintbrushes during active crafting sessions.
  • Supplies Needed: Upcycled pantry cabinet, milk paint, wire mesh screening, galvanized metal buckets, enamelware basins, clipboards.

12. The Modern Monochromatic Studio Cabinet

Sleek, sophisticated, and wonderfully serene, this monochromatic black-and-white cabinet design utilizes matte black storage boxes with crisp white graphic labels for a high-contrast, modern architectural look.

  • How to Make It: Paint your entire cabinet structure in a deep matte black finish. Use uniform matte black cardboard storage boxes and file boxes equipped with striking white leather pull tabs. Apply bold typographic label stickers to each box to clearly designate categories like “Adhesives,” “Sculpting,” and “Drawing.”
  • Tips and Variations: Introduce subtle touches of warm natural beechwood through small accessories like wooden stamp blocks or brush holders to soften the starkness of the black-and-white palette. Ensure your cabinet lighting features warm 2700K bulbs to keep the dark interior feeling cozy rather than sterile.
  • Supplies Needed: Matte black cabinet paint, uniform black storage boxes, white leather pull tabs, custom typographic label stickers, warm LED puck lights.

13. The Built-In Pull-Out Table and Supply Tower

Maximizing limited square footage, this ingenious design features a heavy-duty pull-out laminate work surface concealed right beneath the primary supply shelving tower, pulling out instantly when creativity strikes.

  • How to Make It: Install full-extension heavy-duty locking drawer slides about halfway up your tall storage cabinet, attaching a sturdy butcher block or laminate tabletop across the slides. When pushed in, it sits flush like a false drawer front; when pulled out, it provides an instant standing-height craft desk with supplies stored directly above and below.
  • Tips and Variations: Line the pull-out tabletop with a self-healing cutting mat or silicone craft sheet so kids can cut and glue directly on the surface without damaging the wood. Install a shallow utensil drawer directly beneath the pull-out surface for immediate access to scissors and tape.
  • Supplies Needed: Tall storage cabinet, full-extension locking drawer slides, butcher block panel, silicone craft mat, heavy-duty mounting hardware.

14. The Montessori-Aligned Low-Shelf Independent Station

Designed to foster independence and self-reliance in young children, this low-profile cabinet keeps all materials within waist-height reach, encouraging kids to select, use, and return items entirely on their own.

  • How to Make It: Choose a wide, low-profile credenza-style cabinet rather than a tall tower. Organize materials onto low, open wooden trays rather than deep boxes so that every single item is fully visible and accessible from a toddler’s perspective. Limit the number of available items to prevent sensory overload and simplify cleanup.
  • Tips and Variations: Rotate the available crafting trays bi-weekly to keep children engaged with fresh materials while packing away older items into upper storage zones. Place small, child-sized cleaning brushes and dustpans inside the cabinet so kids can easily sweep up paper scraps independently.
  • Supplies Needed: Low credenza cabinet, shallow wooden sorting trays, natural fiber mini broom and dustpan set, laminated visual instruction cards.

15. The Colorful Acrylic Modular Cube Stack

Bright, playful, and wonderfully modern, this design stacks translucent neon-tinted acrylic cube modules inside a clear glass-front cabinet to create a glowing, color-saturated storage display.

  • How to Make It: Arrange stackable translucent colored acrylic storage cubes inside a minimalist white cabinet frame. Group supplies by glowing color spectrums—storing pink markers in the translucent pink cube, blue paints in the blue cube, and yellow ribbons in the yellow cube.
  • Tips and Variations: Position battery-operated LED puck lights at the base of the cabinet shining upward through the translucent cubes to create a stunning glowing stained-glass lighting effect during evening craft hours. Keep extra replacement batteries stored neatly in a small side compartment.
  • Supplies Needed: White cabinet frame, translucent colored acrylic storage cubes, battery-operated LED puck lights, adhesive Velcro strips.

16. The Rotating Carousel Tower Cabinet

Making use of awkward corner spaces or tight wall gaps, this spinning carousel cabinet allows children to access four distinct sides of art supplies with a simple gentle spin of the hand.

  • How to Make It: Install a heavy-duty vertical lazy susan bearing plate at the base of a custom-built floor-to-ceiling square wooden column. Partition each of the four vertical sides with shallow shelves designed specifically for paint bottles, marker cups, scissor racks, and sticker books respectively.
  • Tips and Variations: Paint each of the four exterior sides a different complementary color (such as sunburst yellow, sky blue, coral pink, and mint green) so children can easily memorize which side holds their favorite supplies. Add anti-tip wall anchoring brackets to ensure total safety during spinning.
  • Supplies Needed: Heavy-duty lazy susan bearing, square wooden column structure, compartmentalized side shelving, anti-tip wall anchor kit.

17. The Vintage Library Card Catalog Repurposed

Exuding timeless intellectual charm, an authentic or replica library card catalog cabinet provides unmatched structural perfection for sorting miniature crafting elements into distinct, alphabetized, or categorized pull drawers.

  • How to Make It: Secure a vintage wooden library card catalog chest and clean the hardware thoroughly. Remove outdated index cards and replace them with custom craft category cards (e.g., “Pipes,” “Pompoms,” “Stamps,” “Stickers”). Use the deep rows of small pull drawers to keep tiny crafting components impeccably sorted and dust-free.
  • Tips and Variations: Line the bottom of each shallow card drawer with colorful felt pads to cushion delicate items and eliminate rattling sounds when drawers slide shut. Polish the wooden exterior with natural beeswax to restore its rich vintage luster.
  • Supplies Needed: Library card catalog cabinet, custom category index cards, felt drawer liner sheets, natural beeswax furniture polish.

18. The Rolling Under-Bed Style Low Cabinet Bank

Ideal for rooms where vertical wall space is limited, this low-slung horizontal cabinet features heavy-duty caster wheels that roll effortlessly out from beneath a window seat or bench, housing an entire art studio.

  • How to Make It: Build a low, wide horizontal wooden cabinet frame fitted with heavy-duty rubber swivel caster wheels on the bottom corners. Divide the interior into deep, compartmentalized bays designed to hold vertical paper caddies, paint caddies, and lidded supply bins. Equip the front with sleek leather pull handles.
  • Tips and Variations: Top the horizontal cabinet with high-density foam cushions covered in durable canvas fabric to instantly double the storage unit into a cozy reading and drawing window bench. Use locking caster wheels on two corners to keep the unit stable while kids lean against it.
  • Supplies Needed: Low horizontal wooden cabinet frame, heavy-duty swivel casters with brakes, leather pull handles, high-density upholstery foam, durable canvas cushion cover.

19. The Magnetic Tin Wall Grid Inside Cabinet Doors

Utilizing industrial-chic wire mesh grids mounted inside cabinet doors, this concept suspends dozens of colorful magnetic metal tins to hold an extensive collection of markers, pastels, and modeling tools.

  • How to Make It: Mount heavy-duty square steel wire grid panels directly onto the inside doors of a wide art cabinet using standoff clips. Equip dozens of matching colorful magnetic steel utility tins with secure snap-on lids, filling them with sorted drawing utensils and embellishments before snapping them onto the wire grid framework.
  • Tips and Variations: Arrange the magnetic tins in an ombre color gradient across the grid door for an instantly satisfying visual display that doubles as modern art. Use permanent metallic marker labels on the bottom of each tin to note refill colors.
  • Supplies Needed: Steel wire grid panels, standoff mounting clips, magnetic utility tins in assorted colors, permanent metallic marker.

20. The Hidden Pull-Out Drying Rack Cabinet

Tackling the eternal wet-paint storage dilemma, this custom vertical cabinet incorporates a secret pull-out multi-tier wire drying rack system that slides smoothly out of sight while paintings cure safely.

  • How to Make It: Construct a tall, narrow vertical pull-out cabinet insert equipped with side-mount drawer slides. Install four to six wire mesh or wooden slatted shelves horizontally within the sliding frame, spaced several inches apart to allow wet watercolor paintings, clay sculptures, and glued crafts to dry safely away from household traffic.
  • Tips and Variations: Line each sliding drying shelf with a removable, washable silicone baking mat so drips from wet paints or glues peel right off easily once dry. Add a small ventilation fan or louvered door vent to promote healthy air circulation inside the enclosed drying zone.
  • Supplies Needed: Tall narrow cabinet frame, side-mount drawer slides, wire mesh shelving inserts, silicone mats, louvered vent insert.

More ideas to come in future addition!