Spread the love

Transforming worn, broken, or handmade jewelry into captivating wall decor, tactile canvas creations, and functional home accents is one of the most fulfilling ways to blend craft with interior design. DIY jewelry art breathes new life into forgotten treasures, turning sentimental keepsakes and sparkling trinkets into eye-catching focal points that elevate any living space. Whether your home reflects a sleek modern palette, a warm bohemian atmosphere, or a romantic vintage charm, these artistic projects offer versatile ways to showcase your creativity.

Below is a comprehensive guide to 20 Aesthetic & Inspiring DIY Jewelry Art Ideas, featuring detailed breakdowns of each concept, step-by-step creation guides, practical crafting advice, variation ideas, and complete material checklists.

1. Botanical Wire & Pressed Gemstone Wall Monogram

What This Idea Means

This artistic concept merges personalized typography with organic botanical design. Using sturdy craft wire, you shape a elegant initial monogram and weave in small gemstone beads, wire-wrapped leaves, and tiny beaded floral clusters. Mounted inside a deep shadowbox or hung directly on an accent wall, it serves as a sophisticated custom focal point.

How to Make It

  1. Design the Template: Print or draw your chosen letter template on a sheet of paper to serve as a visual guide.
  2. Form the Main Frame: Mold thick 16-gauge aluminum or brass wire along the printed outline to form the structural base of the letter, securing joints with thin wrapping wire.
  3. Add Botanical Accents: Using 24-gauge wire, twist small metallic leaf charms, gemstone chip beads (like quartz, jade, or amethyst), and glass seed beads into delicate vine-like branches.
  4. Wrap and Weave: Secure the beaded branches along the main wire letter frame, coiling the thin wire tightly around the structural base.
  5. Mounting: Secure the finished wire letter inside a linen-lined shadowbox frame using clear thread or mount it directly to the wall using brass finishing nails.

Tips & Variations

  • Tip: Use nylon-jaw pliers when bending the main frame wire to avoid scratching or denting the metal surface.
  • Variation: Create a full word (such as “CREATE” or “HOME”) using smaller connected script lettering for a larger gallery wall arrangement.

What You Need

  • 16-gauge aluminum or brass craft wire (structural base)
  • 24-gauge wrapping wire
  • Assorted gemstone chip beads & metallic leaf charms
  • Jewelry pliers (Nylon-jaw, round-nose, and flush cutters)
  • Linen-lined shadowbox frame or brass mounting nails

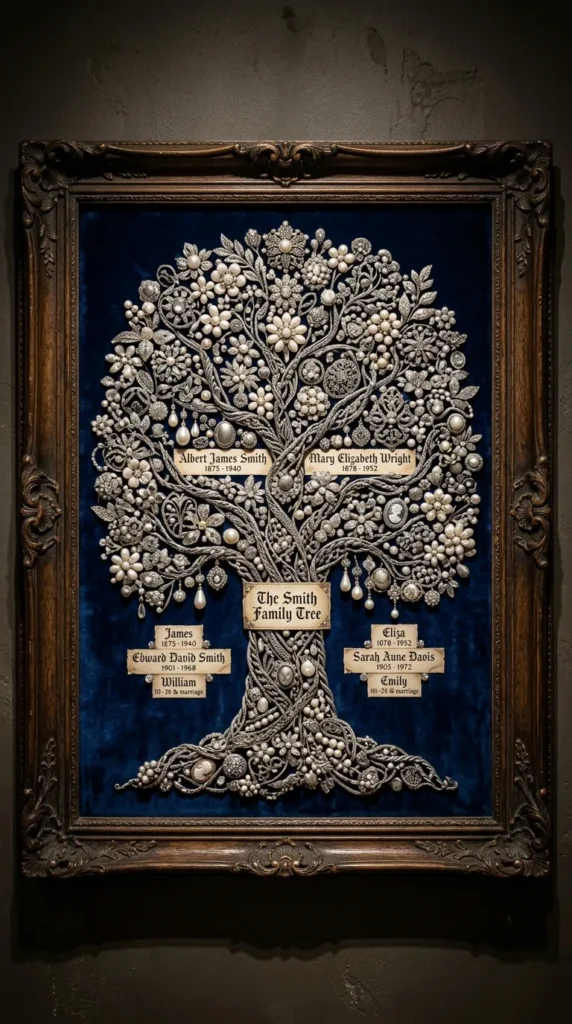
2. Framed Vintage Jewelry Mosaic Family Tree

What This Idea Means

A sentimental heirloom piece, the jewelry mosaic family tree uses inherited or collected vintage brooches, single earrings, and beaded strands to represent family generations along a glittering metallic tree structure set against a rich fabric backdrop.

How to Make It

  1. Prepare the Backing: Wrap the sturdy backing board of a large picture frame with high-grade cotton canvas or plush velvet fabric, stapling it securely at the back.
  2. Outline the Tree: Trace a gentle, spreading tree silhouette onto the fabric using a chalk pencil.
  3. Construct Trunk & Branches: Form the trunk and main branches using twisted multi-strand metallic chains or braided thick wire, gluing them down with heavy-duty clear craft adhesive (E6000).
  4. Layer Jewelry Leaves: De-pin vintage brooches and cluster earrings. Glue them along the upper branches to form dense, shimmering foliage. Place family birthstone pieces or specific inherited heirlooms on key branch junctions.
  5. Frame: Reassemble the picture frame without the front glass to allow the textured 3D jewelry elements to pop visually.

Tips & Variations

  • Tip: Place heavy books on top of glued flat chain sections while they dry to ensure a flush bond against the fabric.
  • Variation: Craft a monochromatic version using exclusively silver, pearl, and clear crystal jewelry pieces for a icy winter-themed aesthetic.

What You Need

  • Large wooden picture frame (11×14 inches or larger)
  • Velvet or heavyweight canvas fabric
  • Assorted vintage jewelry (Brooches, single earrings, chains)
  • E6000 or heavy-duty clear craft glue
  • Flush wire cutters & chalk pencil

3. Resin-Cast Jewelry & Dried Botanical Wall Coasters

What This Idea Means

This project encapsulates delicate jewelry elements—such as thin gold chains, micro-charms, and glass beads—alongside pressed dried flowers within crystal-clear resin discs. Displayed on thin ledges or hung in sets using delicate chains, these translucent art pieces capture and refract ambient natural light.

How to Make It

  1. Prepare Silicone Molds: Clean round or hexagonal silicone coaster molds thoroughly with rubbing alcohol.
  2. Pour Initial Resin Layer: Mix a two-part clear epoxy resin according to instructions. Pour a thin base layer (approx. 1/8 inch) into each mold and let it sit until tacky (about 2 to 3 hours).
  3. Arrange Composition: Gently place pressed dried flowers, gold leaf flakes, micro jewelry chains, and small polished gemstone beads onto the tacky resin using tweezers.
  4. Pour Top Layer: Mix a second batch of clear resin and pour it carefully over the arrangement to submerge all elements completely.
  5. Cure and Finish: Pass a mini heat gun lightly over the surface to release micro-bubbles. Allow to cure completely for 48 hours before demolding.

Tips & Variations

  • Tip: Warm the resin bottles in a warm water bath before mixing to drastically minimize bubble formation.
  • Variation: Drill a tiny hole at the top of each cured disc and connect them vertically with jump rings to build a light-catching hanging room divider.

What You Need

  • Silicone coaster/disc molds
  • Two-part clear epoxy resin & mixing cups
  • Dried pressed flowers & leaf skeleton accents
  • Small jewelry chains, charms, and gemstone chips
  • Tweezers & mini heat gun

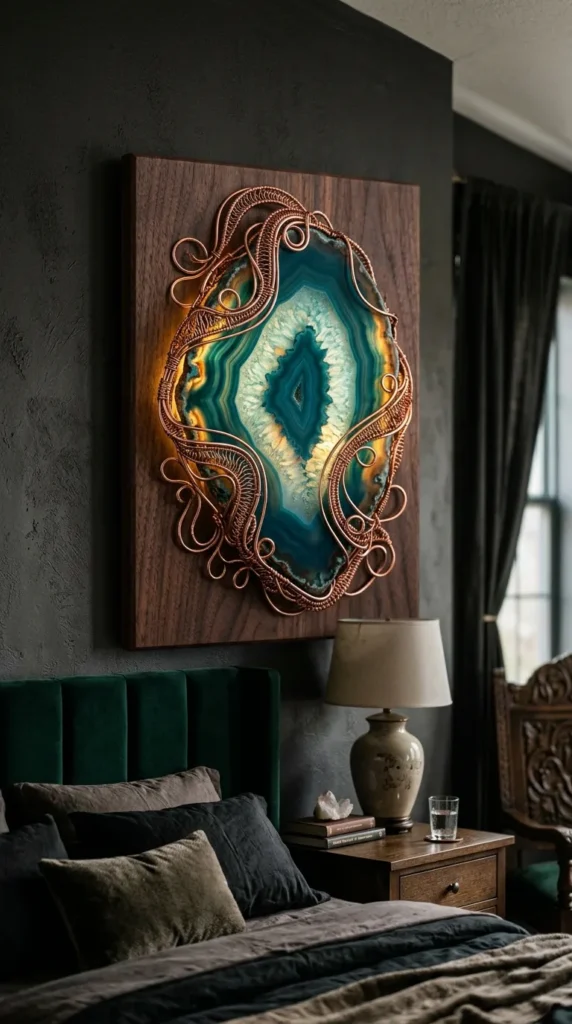
4. Sculptural Wire-Wrapped Agate Slice Wall Sconces

What This Idea Means

Combining geological formations with jewelry metalworking, this project wraps large polished agate slices in intricate filigree wire designs and mounts them onto wall-installed wooden plaques fitted with warm LED lights. The backlit agate glows while highlighting the detailed jewelry wirework.

How to Make It

  1. Prepare Wooden Plaque: Sand and stain a hardwood plaque (dark walnut or ebony finish). Drill a central hole for LED wire pass-through.
  2. Wire-Wrap Agate: Wrap a large, semi-translucent agate slice using 20-gauge copper or brass wire, weaving decorative swirls, spirals, and bail loops around the outer edges using 26-gauge binding wire.
  3. Install Backlighting: Affix a small, battery-operated LED puck light or warm LED strip module to the front center of the wood plaque.
  4. Mount the Agate: Mount the wire-wrapped agate slice securely 1 inch in front of the light module using brass standoff hardware attached to the wire wrapping loops.
  5. Mounting: Attach picture hanging hardware to the rear of the wood plaque and hang on your wall.

Tips & Variations

  • Tip: Choose agate slices with natural crystal quartz centers (geode openings) so light shines through the middle of the stone.
  • Variation: Wrap smaller agate slices into a cluster of three to form a dynamic geometric wall sculpture.

What You Need

  • Polished semi-translucent agate slices
  • 20-gauge structural craft wire & 26-gauge wrapping wire
  • Hardwood plaques & wood stain
  • Warm white mini LED puck lights or modules
  • Jewelry pliers set & standoff mounting hardware

5. Driftwood & Beaded Jewelry Strand Suncatcher Art

What This Idea Means

A harmonious blend of coastal nature and vibrant beadwork, this project uses a piece of weathered driftwood to anchor long, cascading strands of glass crystal beads, repurposed necklace beads, and brass filigree pendants. Hung near a sunny window, it casts shimmering prisms across room walls.

How to Make It

  1. Prep Driftwood: Clean a curved piece of driftwood thoroughly with a wire brush and let it dry completely. Seal with matte varnish.
  2. Design Bead Strands: Cut lengths of strong bead-stringing wire. Thread alternating patterns of faceted glass crystal beads, metallic spacers, and vintage glass beads.
  3. Attach End Pendants: Crimp a heavy crystal prism or filigree pendant onto the bottom end of each strand using crimp beads and pliers.
  4. Attach to Driftwood: Drill tiny spaced holes along the underside of the driftwood. Thread the top wire of each bead strand through a hole and secure with crimp beads on top.
  5. Add Hanger: Tie sturdy jute twine or a thick brass chain to both ends of the driftwood for hanging.

Tips & Variations

  • Tip: Vary the lengths of the bead strands in a subtle V-shape curve to give the arrangement natural visual rhythm.
  • Variation: Incorporate small brass bells or chime bars to add gentle sound effects when windows are open.

What You Need

  • Weathered driftwood piece (18 to 24 inches long)
  • Assorted glass crystal beads & repurposed necklace strands
  • Bead-stringing wire (49-strand coated steel) & crimp beads
  • Faceted crystal prisms or metal pendants
  • Hand drill with micro drill bit & pliers

6. Geometric Brass & Beaded Kinetic Mobile Art

What This Idea Means

Inspired by modern kinetic art, this hanging wall sculpture uses lightweight brass tubing, geometric wire shapes, and strategically placed gemstone beads. Balanced on fine wire pivots, the pieces move gently with room air currents, creating changing shadow patterns on adjacent walls.

How to Make It

  1. Form Geometric Shapes: Cut thin brass tubes and solid brass wire into geometric shapes (triangles, diamonds, arches) using a jeweler’s saw or tubing cutter.
  2. Wire-Wrap Bead Centers: Suspend large polished gemstone beads or metallic glass pearls in the center of each geometric shape using fine gauge wire.
  3. Assemble Balance Arms: Connect pairs of geometric shapes to opposite ends of thin brass rods using jump rings.
  4. Find Balance Points: Find the equilibrium point of each arm by balancing it on a needle, then attach a suspension loop at that exact point.
  5. Connect Tiered Levels: Connect multiple balance arms vertically using fine monofilament or light chain, creating a multi-tiered kinetic assembly.
  6. Mount: Hang the top ring from a decorative wall hook mounted 4 to 6 inches away from the wall surface.

Tips & Variations

  • Tip: Work from the bottom tier upward when constructing kinetic mobiles to ensure proper weight distribution at every level.
  • Variation: Paint some brass shapes with matte black enamel for a stark, high-contrast modern mid-century look.

What You Need

  • Thin brass tubing & solid brass wire (18-gauge)
  • Polished gemstone beads or metallic pearls
  • Tubing cutter or fine jeweler’s saw
  • Jump rings & monofilament wire
  • Decorative wall mounting hook

7. Chunky Clay & Beaded Wall Garland Tapestry

What This Idea Means

This tactile wall garland combines hand-sculpted polymer clay beads, oversized natural wooden beads, braided cotton cord, and chunky statement jewelry elements. Draped across an accent wall or headboard, it brings a rich bohemian texture to modern interiors.

How to Make It

  1. Sculpt Clay Beads: Roll polymer clay into oversized geometric shapes (arches, spheres, disks). Texture surfaces with stamps or canvas fabric before baking.
  2. Bake and Cool: Bake the clay beads according to package directions and let them cool completely. Paint select beads with metallic acrylic accents.
  3. Prepare Garland Cord: Cut a 5-foot length of thick 5mm braided cotton or jute cord.
  4. String the Components: Thread your handmade clay beads, oversized wooden beads, and chunky metal jewelry components onto the cord, alternating shapes and textures.
  5. Add End Tassels: Attach large handmade cotton thread tassels decorated with beaded metal wire wraps onto both ends of the garland.
  6. Drape and Secure: Hang the garland using brass wall pegs, letting it drape in natural swooping curves.

Tips & Variations

  • Tip: Use a wooden skewer to poke generous center holes through clay beads before baking so they easily fit over thick garland cord.
  • Variation: Stick to a strict monochrome palette of white, beige, and matte black clay for a minimalist Scandinavian aesthetic.

What You Need

  • Polymer clay (Terracotta, Cream, Charcoal)
  • Large wooden beads & chunky metal jewelry parts
  • 5mm braided cotton or jute cord
  • Metallic acrylic paint & paintbrushes
  • Brass wall pegs for mounting

8. Metallic Thread & Beaded Embroidery Hoop Wall Art

What This Idea Means

This art form combines textile hand-embroidery with jewelry-making techniques. Metallic embroidery threads are stitched onto dark linen stretched inside wooden hoops, then embellished with intricate seed bead constellations, gemstone chips, and small metal charm overlays.

How to Make It

  1. Stretch Fabric: Mount dark navy or charcoal linen fabric tightly inside a polished wooden embroidery hoop. Trim excess fabric from the rear.
  2. Transfer Art Design: Lightly trace your line design (such as abstract geometric waves or celestial star maps) using a fabric chalk pen.
  3. Stitch Metallic Lines: Embroider the main structural lines using gold or silver metallic embroidery floss using simple backstitches.
  4. Bead Embellishment: Sew seed beads, bugle beads, and gemstone chips along the stitched lines using fine beaded embroidery thread.
  5. Attach Charm Centers: Sew central metal charms or small brooch pieces onto key intersection points.
  6. Backing Finish: Glue a circular felt backing over the rear of the hoop to conceal stitches, then hang by the top brass adjustment screw.

Tips & Variations

  • Tip: Use thread conditioner on metallic embroidery floss to prevent tangling, fraying, and kinking while stitching.
  • Variation: Use multiple sized hoops (5-inch, 8-inch, 12-inch) to create a cohesive wall display collection.

What You Need

  • Wooden embroidery hoops (8 to 12 inches)
  • Dark linen or velvet fabric
  • Metallic embroidery floss (Gold, Silver, Bronze)
  • Glass seed beads, bugle beads, & gemstone chips
  • Beading needles, fabric chalk, & felt sheet for backing

9. Layered Leather & Jeweled Wall Medallion

What This Idea Means

Combining rustic leathercraft with fine jewelry components, this wall medallion features concentric rings of laser-cut or hand-carved leather layered over polished brass disks, centered with a prominent gemstone cabochon and detailed wire wrap detailing.

How to Make It

  1. Cut Leather Disks: Cut concentric circular disks from thick vegetable-tanned leather, tooling geometric edge borders using leather stamps.
  2. Dye and Polish: Apply dark mahogany or tan leather dye, let dry, and burnish the edges smooth with a wooden slicker.
  3. Layer Metal Base: Sandwich a polished brass sheet disk behind the leather cutout so the warm metal shines through tooled leather patterns.
  4. Mount Center Focal Stone: Wire-wrap a large turquoise, jasper, or lapis lazuli cabochon onto a brass bezel plate and rivet it to the center of the leather medallion.
  5. Add Hanging Loop: Attach a heavy leather hanging loop to the top rim using brass double-cap rivets.

Tips & Variations

  • Tip: Dampen the leather surface slightly with water before stamping to achieve deep, crisp tool impressions.
  • Variation: Add hanging leather fringe decorated with brass beads along the lower rim of the medallion.

What You Need

  • Vegetable-tanned tooling leather sheet
  • Leather dyes & edge burnishing tool
  • Polished sheet brass disks
  • Gemstone cabochon & craft wire
  • Leather hole punch & brass rivets

10. Vintage Brooch & Silk Ribbon Wall Wreath

What This Idea Means

A luxury decorative wreath crafted by wrapping a ring base in rich silk or velvet ribbon, then densely embellishing it with a curated arrangement of vintage brooches, single clip earrings, and pearl pins. It functions as an opulent wall accent or door focal point.

How to Make It

  1. Wrap Ring Base: Take a flat wooden or dense foam wreath ring (10 to 12 inches) and wrap it tightly with wide silk satin ribbon, securing ends with hot glue.
  2. Sort Jewelry Composition: Arrange your vintage brooches and earrings by color scale on a table to plan balanced placement.
  3. Anchor Primary Brooches: Attach your largest statement brooches along the lower curve of the wreath, pinning them directly into the foam/ribbon base or using E6000 glue.
  4. Fill In Interstitial Spaces: Nest small clip-on earrings, pearl studs, and crystal charms into gaps between large brooches.
  5. Attach Hanger: Loop a long length of matching silk ribbon through the top of the wreath, tying a plush bow for wall suspension.

Tips & Variations

  • Tip: If using a foam base, insert pin backs directly into the foam and add a dab of hot glue at the entry point for double security.
  • Variation: Create a seasonal bridal version using all-pearl and clear crystal vintage jewelry pieces set against cream silk ribbon.

What You Need

  • Flat wooden or high-density foam wreath frame
  • Wide silk satin or velvet ribbon (2 to 3 inches wide)
  • Assorted vintage brooches, earrings, & pearl pins
  • E6000 adhesive or hot glue gun
  • Fabric scissors

11. Upcycled Watch Gear & Circuit Board Steampunk Canvas Art

What This Idea Means

Appealing to industrial and steampunk decor lovers, this artwork layers deconstructed mechanical watch gears, vintage clock hands, wire components, and broken circuit board fragments onto a textured canvas base painted in rich metallic patinas.

How to Make It

  1. Create Canvas Texture: Apply heavy modeling paste onto a stretched canvas (8×10 or 11×14) using a palette knife, creating swirling industrial textures.
  2. Embed Hard Components: Press watch gears, clock hands, copper wire coils, and circuit board pieces into the wet modeling paste.
  3. Apply Base Coat: Once the paste cures completely (24 hours), paint the entire canvas surface with matte black acrylic paint.
  4. Apply Metallic Patina: Dry-brush acrylic paints in metallic copper, bronze, and antique gold over raised mechanical surfaces. Dab turquoise paint in crevices to simulate verdigris patina.
  5. Highlighting: Touch up top gear teeth with silver gilding wax to make metallic details pop.

Tips & Variations

  • Tip: Use a stiff bristle brush when dry-brushing metallic paints to keep paint on high edges without filling deep, dark crevices.
  • Variation: Incorporate an old analog clock mechanism into the center of the canvas so the industrial art functions as a working wall clock.

What You Need

  • Stretched canvas board
  • Acrylic modeling paste & palette knife
  • Deconstructed watch gears, clock hands, & copper components
  • Acrylic paints (Matte Black, Copper, Gold, Turquoise)
  • Gilding wax (Silver/Bronze)

12. Floating Glass & Beaded Constellation Art

What This Idea Means

This modern minimalist concept suspends tiny glass seed beads, metallic spacer beads, and delicate jewelry chains between two panes of clear glass within a floating frame. The translucent backing creates the illusion that sparkling star constellations are hovering mid-air against your wall.

How to Make It

  1. Clean Glass Panes: Remove the dual glass panes from a floating picture frame and clean thoroughly with glass cleaner.
  2. Map Out Pattern: Place your constellation template underneath the bottom glass pane to serve as your visual guide.
  3. Glue Bead Nodes: Place tiny dots of clear UV-curing adhesive at each star position on the glass pane using a toothpick. Place glass beads onto dots using fine tweezers.
  4. Connect Line Strands: Glue ultra-fine silver jewelry chain lengths between bead nodes to outline constellation connection paths.
  5. Cure and Assemble: Shine a UV light flashlight over the glass to instantly cure the adhesive. Place the top glass pane over the assembly and secure inside the frame.

Tips & Variations

  • Tip: Handle glass panes with cotton gloves to prevent leaving fingerprints on internal glass surfaces before sealing.
  • Variation: Paint subtle watercolor nebula clouds onto the rear glass pane before adding front bead constellations for added color depth.

What You Need

  • Floating glass picture frame (8×10 inches or similar)
  • Metallic seed beads, glass crystals, & fine link chain
  • Clear UV-curing adhesive & UV flashlight
  • Tweezers & toothpick applicators
  • Lint-free microfiber cloth & glass cleaner

13. Macramé & Gemstone Cabochon Wall Tapestry

What This Idea Means

This project integrates fine macramé knotting with large wire-wrapped gemstone cabochons (like amethyst, labradorite, or rose quartz). The cotton cord knots cradle natural raw stones, weaving fiber art and jewelry artistry into a bohemian wall tapestry.

How to Make It

  1. Mount Base Cord: Attach 4mm single-strand cotton cord onto a wooden dowel or natural branch using lark’s head knots.
  2. Knot Upper Panel: Knot a series of square knots and diagonal double half-hitch patterns to form a structured upper border.
  3. Incorporate Stone Bezel: Wire-wrap a net pocket using fine craft wire around a large gemstone cabochon.
  4. Weave Stone into Cord: Anchor the wire loops of the gemstone holder securely into the central macramé cords as you knot downward.
  5. Finish Fringe: Trim lower cords into a clean V-shape fringe and comb out cord ends with a fine-tooth comb for a soft feather effect.

Tips & Variations

  • Tip: Choose raw or tumbled stones with distinct side grooves so wire wrapping stays locked around the stone perimeter.
  • Variation: Dip-dye the bottom fringe of the finished macramé in textile dye to match the color tone of the central gemstone.

What You Need

  • 4mm single-strand cotton macramé cord
  • Wooden dowel or natural tree branch
  • Large polished gemstone cabochons (Labradorite, Amethyst, Quartz)
  • 22-gauge aluminum craft wire
  • Fine-tooth comb & scissors

14. Modern Polymer Clay & Brass Geometric Wall Hanging

What This Idea Means

Clean lines, modern shapes, and warm metallic accents define this contemporary piece. Cutout polymer clay shapes (half-moons, arches, circles) are combined with raw stamped brass jewelry blanks, connected vertically with jump rings to form a minimalist wall sculpture.

How to Make It

  1. Condition and Roll Clay: Roll out polymer clay to a uniform 1/8-inch thickness using an acrylic roller.
  2. Cut Geometric Shapes: Cut out geometric shapes (arches, circles, triangles) using clay cutters or a utility knife. Poke attachment holes near edges using a needle tool.
  3. Bake and Sand: Bake clay pieces according to package instructions. Once cool, sand edges smooth with fine 400-grit sandpaper.
  4. Assemble with Brass Blanks: Alternate baked clay shapes with matching stamped brass geometric jewelry blanks, connecting them using large brass jump rings.
  5. Mounting: Attach the top ring of the vertical chain assembly to a brass wall hook or nail.

Tips & Variations

  • Tip: Bake clay pieces between two ceramic tiles to prevent flat shapes from curling or warping while in the oven.
  • Variation: Mix specked clay (granite effect) with terracotta tones for a warm desert-modern aesthetic.

What You Need

  • Polymer clay (Neutral tones, Terracotta, Sage)
  • Stamped brass geometric jewelry blanks
  • Polymer clay cutters & acrylic roller
  • Large brass jump rings & jewelry pliers
  • Fine 400-grit sandpaper

15. Vintage Jewelry-Accented Venetian Mirror Panel

What This Idea Means

Transforming simple wall mirror panels into opulent Venetian-style accents, this idea uses ornate clear glass beads, vintage crystal earrings, and silver filigree jewelry corners to build a glittering, decorative border around a wall mirror.

How to Make It

  1. Prepare Base Mirror: Clean a frameless bevel-edged glass mirror panel (12×12 inches square or round).
  2. Map Border Design: Layout clear crystal brooches, silver filigree pieces, and faceted crystal beads along mirror edges.
  3. De-Pin Jewelry: Remove pin backs and clips from all jewelry components using wire cutters.
  4. Adhere Corner Clusters: Glue large ornate crystal brooches onto the four corners of the mirror using clear two-part epoxy.
  5. Connect Edge Strands: Glue linear rows of clear faceted glass beads and silver jewelry stampings along the border edges connecting the corners.
  6. Cure & Mount: Allow epoxy to cure for 24 hours, then mount mirror securely using heavy-duty mirror hanging hardware.

Tips & Variations

  • Tip: Use clear two-part epoxy rather than hot glue to ensure long-term bonding onto smooth glass surfaces.
  • Variation: Use smoked glass or antique tinted mirror panels for a moody, vintage bedroom atmosphere.

What You Need

  • Frameless bevel-edged glass mirror panel
  • Clear crystal brooches, earrings, & glass beads
  • Silver metal filigree stampings
  • Two-part clear epoxy adhesive
  • Flush wire cutters & glass cleaner

16. Hand-Poured Resin & Gemstone Geode Canvas Wall Art

What This Idea Means

Simulating natural crystal geodes on a grand scale, this mixed-media canvas project uses pouring resin, crushed glass, real raw gemstone chips (like amethyst or quartz), and metallic leafing to craft a dynamic, glowing wall feature.

How to Make It

  1. Prepare Canvas Base: Draw an organic geode opening shape across a heavy-duty wood gallery canvas panel.
  2. Build Crystal Borders: Glue crushed clear glass and raw gemstone chips along the drawn geode lines using heavy gel medium.
  3. Pour Colored Resin: Mix clear resin batches tinted with mica powders (deep teal, violet, metallic gold). Pour resin in concentric bands around the crystal borders.
  4. Blend Gas Effects: Blow across resin bands using a heat gun or straw to create natural swirling liquid mineral patterns.
  5. Gilding Details: Once cured (24 hours), apply liquid gold leafing along the outer edges of the geode lines to complete the crystal formation look.

Tips & Variations

  • Tip: Use a wood panel canvas rather than stretched cotton canvas, as heavy resin and crushed glass require a rigid support base.
  • Variation: Use black, charcoal, and metallic silver pigments for a sleek, contemporary monochrome geode design.

What You Need

  • Wood gallery canvas panel (16×20 inches or larger)
  • Clear pouring epoxy resin & mica powder pigments
  • Crushed clear glass & raw gemstone chips (Amethyst/Quartz)
  • Liquid gold leaf & fine detail paintbrush
  • Heat gun & heavy gel medium

17. Upcycled Earring & Filigree Decorative Shadowbox Grid

What This Idea Means

A modern gallery display concept that arranges individual mismatched vintage earrings, filigree charms, and unique jewelry parts inside a multi-window shadowbox frame grid. Each compartment holds a single miniature jewelry artwork against textured paper.

How to Make It

  1. Prepare Grid Shadowbox: Take a multi-compartment grid shadowbox frame (e.g., 9-window or 12-window layout).
  2. Cut Background Papers: Cut square background pieces from textured scrapbooking paper, handmade mulberry paper, or linen to fit each grid pocket.
  3. Curate Jewelry Pieces: Select unique single earrings, vintage buttons, filigree keys, or small pendants that complement each other in tone.
  4. Mount Jewelry: Glue one central jewelry component onto each paper square using heavy-duty foam adhesive dots for a raised 3D effect.
  5. Assemble Frame: Insert background squares into shadowbox grid pockets and secure the rear frame backing.

Tips & Variations

  • Tip: Group jewelry items by a common color theme (e.g., all warm brass, or all turquoise and silver) to maintain visual harmony across the grid.
  • Variation: Write small handwritten vintage labels or dates beneath each jewelry piece inside the grid pockets.

What You Need

  • Multi-compartment grid shadowbox frame
  • Textured handmade paper or linen scraps
  • Unique single vintage earrings, charms, & filigree pieces
  • 3D foam adhesive dots & E6000 glue
  • Scissors & ruler

18. Braided Leather & Metal Chain Wall Tapestry

What This Idea Means

This edgy yet refined wall artwork combines braided leather strips, heavy industrial jewelry chains, polished brass rings, and dangling metal tassels. The contrast between soft leather and cold gleaming metal produces a high-end textured accent piece.

How to Make It

  1. Prepare Top Mounting Rod: Select a heavy 1-inch thick brass tube or dark stained wood dowel.
  2. Braid Leather Straps: Braid strips of dark brown and black leather cord, attaching them across the bar using heavy brass jump rings.
  3. Interweave Chains: Drape mixed metal chains (gunmetal, antique brass, silver) between leather braids at varying loop depths.
  4. Attach Central Rings: Interlock large brass o-rings along the center, connecting hanging metal chain tassels down the middle.
  5. Trim and Balance: Adjust chain drape lengths using pliers until the overall tapestry achieves a balanced, symmetrical silhouette.

Tips & Variations

  • Tip: Mix different chain link styles (box chain, curb chain, rope chain) to maximize light reflection across the metal surface.
  • Variation: Add real suede fringe strands along the sides for a warmer rustic finish.

What You Need

  • Heavy brass tube or wooden mounting dowel
  • Leather strips/cording (Black & Dark Brown)
  • Mixed metal jewelry chains & brass O-rings
  • Heavy-duty jump rings & jewelry pliers
  • Scissors & tape measure

19. Woven Beaded Medallion & Feather Wall Hanging

What This Idea Means

Combining native-inspired bead weaving with soft organic textures, this wall hanging features a circular off-loom beaded medallion stitched with glass seed beads, centered with a polished turquoise stone, and finished with delicate wire-wrapped metallic feathers.

How to Make It

  1. Prepare Beading Foundation: Cut a circular piece of stiff bead embroidery foundation fabric (Lacy’s Stiff Stuff).
  2. Glue Center Stone: Glue a flat-backed turquoise cabochon to the center of the fabric using E6000.
  3. Bead Around Stone: Stitch concentric circles of glass seed beads around the stone using a fine beading needle and strong Nymo thread.
  4. Trim Foundation: Carefully trim excess foundation fabric close to the outer beaded edge without cutting thread stitches.
  5. Attach Feathers and Hanger: Attach wire-wrapped metallic leaf charms or natural dipped feathers to the bottom edge, and attach a beaded hanging loop to the top.

Tips & Variations

  • Tip: Use a backstitch technique (stitching two beads at a time) to ensure bead rows stay straight and sit flat against the fabric.
  • Variation: Use iridescent glass bugle beads to create radiating sunburst lines extending outward from the center stone.

What You Need

  • Beading foundation fabric & Nymo beading thread
  • Turquoise cabochon & glass seed beads
  • Beading needles & micro detail scissors
  • Wire-wrapped metallic leaf/feather charms
  • E6000 craft glue

20. Sculptural Wire-Wrapped Crystal Cluster Wall Medallion

What This Idea Means

A statement wall sculpture crafted by wrapping raw crystal clusters (such as quartz points, fluorite, or pyrites) into a geometric brass wire frame structure. The raw crystal facets catch natural room light while the wirework showcases fine metal crafting skills.

How to Make It

  1. Form Frame Outer Ring: Shape heavy 12-gauge brass wire into a 10-inch geometric outer ring (circle, hexagon, or diamond shape) and solder or wrap the join securely.
  2. Prepare Central Crystal: Select a large, high-clarity raw quartz cluster or fluorite point.
  3. Wire Cage the Crystal: Wrap 20-gauge brass wire around the crystal base to create a secure, decorative wire harness cage.
  4. Suspend Crystal in Frame: Anchor the wire harness onto the outer geometric frame using 24-gauge wrapping wire, keeping the crystal centered in open space.
  5. Add Radiant Wire Spoke Rays: Wrap additional fine wires extending from the crystal outward to frame edges, creating a sunburst effect.
  6. Mounting: Hang the top vertex of the wire geometric frame directly on a brass wall nail.

Tips & Variations

  • Tip: Keep wire wrapping tight and flush against stone edges so heavy crystal clusters remain locked in place over time.
  • Variation: Wrap smaller raw quartz points along the outer frame rim to build a full crystal crown around the central cluster.

What You Need

  • 12-gauge, 20-gauge, & 24-gauge brass craft wire
  • Raw crystal clusters (Quartz, Fluorite, Pyrite)
  • Wire cutters, round-nose pliers, & flat-nose pliers
  • Brass wall nails for mounting
  • Safety glasses