There is an undeniable, grounding power in the quiet richness of the natural world. When translated into nail art, the palette of the deep earth offers a sophisticated alternative to the neon brights of summer and the stark neutrals of standard minimalism. Dark, short, earthy nails are currently dominating mood boards, blending a moody elegance with a low-maintenance, practical silhouette. Short nails provide a clean, modern canvas that feels intentional and chic, while dark earthy tones—think rich soil, crushed pine needles, midnight moss, basalt stone, and rusted clay—ground your look with an organic warmth.
The beauty of this trend lies in its versatility. It effortlessly bridges the gap between edgy grunge and high-end luxury. Whether you are typing away on a laptop, sipping morning matcha, or styling an autumnal wardrobe, dark short earthy nails offer a timeless statement that whispers rather than shouts. This comprehensive guide explores twenty distinct aesthetic concepts within this theme, complete with step-by-step techniques to achieve them at home, variations to suit your personal style, and a dedicated gallery of high-resolution visual prompts at the end to inspire your next salon visit or DIY session.
1. Midnight Moss Velvet Capturing the dense, shadowed floor of an ancient forest, this design uses a deep, dark forest green infused with a magnetic velvet or cat-eye effect. The finish shifts in the light, mimicking the dewy sheen of moss under a canopy of thick trees.
- How to Make It: Apply a standard black gel base to create depth. Layer a magnetic dark green gel polish over top, use a magnet to push the particles into a centered cat-eye streak or a soft diffused velvet glow, and cure. Seal with a glossy top coat.
- Variations: Swap the glossy top coat for a velvety matte finish to give it a true mossy, texture-like appearance.
2. Espresso Bean Minimalist Lines Deep, rich, and grounding like your morning double-shot, this look features an opaque dark espresso brown base accented with ultra-thin, abstract gold foil lines running vertically down the center of each nail.
- How to Make It: Paint your short nails with two coats of a near-black coffee brown. Using a fine liner brush and gold spider gel or gold chrome paint, draw a delicate, slightly imperfect line from cuticle to tip. Cure and protect with a glossy top coat.
- Variations: Replace the gold line with a stark milky white or cream line for a softer, more organic contrast.

3. Deep Basalt Stone Texture Channeling volcanic rock and rugged mountain cliffs, this aesthetic embraces a charcoal-grey, almost black base with subtle, irregular grey veining that mimics natural stone formations.
- How to Make It: Apply a dark charcoal grey gel. While the second coat is wet and uncured, take a fine detail brush dipped in a lighter grey mixed with top coat and feather delicate, cracked lines across the nail. Gently dab with a sponge to soften the edges, then cure.
- Variations: Add tiny flecks of copper foil into the wet polish to resemble pyrite or fool’s gold embedded in stone.

4. Truffle Gradient Ombre A seamless fade from a pale mushroom taupe near the cuticle down to a decadent dark truffle brown at the tip. This creates an elongated illusion on shorter nail beds while staying firmly within the earthy color family.
- How to Make It: Apply a base coat. Paint the bottom half of the nail with taupe and the top half with dark brown. Use a damp makeup sponge to dab and blend the meeting point where the two colors overlap. Repeat twice for opacity, then cure.
- Variations: Reverse the gradient so the darkest shade sits at the cuticle for a dramatic, moody reverse-moon effect.

5. Burnished Clay and Rust Inspired by sun-baked terracotta pottery and oxidized iron, this look combines a deep, earthy rust red with charred black tips for a fiery yet grounded aesthetic.
- How to Make It: Paint nails a solid, deep rust-orange-brown. Using a makeup sponge dipped in dark charcoal brown, lightly dab the very tips of the nails to create a moody, smoked-out French tip effect.
- Variations: Apply a matte top coat over the entire design to enhance the clay-like, ceramic feel.

6. Petrichor Raindrop Accent Evoking the earthy scent of rain falling on dry soil, this design pairs a deep wet-look black-brown base with raised, glossy clear droplets that mimic morning dew clinging to damp earth.
- How to Make It: Apply a high-shine glossy dark brown gel polish and cure. Using a thick builder gel in a bottle and a dotting tool, place small, domed beads of clear gel randomly across the nail. Flash cure each drop individually so they hold their height, then final cure.
- Variations: Place a single larger droplet near the cuticle over a matte background for maximum textural contrast.


7. Smoked Walnut Tortoiseshell A darker, moodier twist on the classic tortoiseshell pattern, featuring deep amber, burnt sienna, and black-brown patches that look like aged hardwood furniture.
- How to Make It: Apply a sheer jelly amber base. Use a fine brush to dab irregular spots of dark walnut brown. While wet, drop a touch of clear alcohol or blender over the brown spots to make them bloom and soften at the edges, then add a final outline of solid black.
- Variations: Keep the tortoiseshell confined to a side-diagonal split, leaving the other half solid dark brown.
8. Raw Umber Chrome Shimmer A raw, unrefined earthy brown elevated by a high-shine metallic chrome powder rubbed over top, giving it the appearance of liquid bronze poured over wet soil.
- How to Make It: Paint nails a deep raw umber brown and cure without wiping the inhibition layer. Rub a champagne-brown or old-gold chrome powder directly onto the surface using an applicator sponge until it gleams. Dust off excess and seal with a non-wipe top coat.
- Variations: Use a holographic chrome powder instead for an unexpected rainbow shift over the dark earthy base.
9. Midnight Pine Needle Flecks A nod to deep pine forests at dusk, featuring a dark pine green base embedded with delicate, scattered black and dark gold flakes that mimic fallen needles on the forest floor.
- How to Make It: Apply two coats of a dark, moody pine green. Layer a special effects topper filled with irregular black and gold metallic flakes over the top. Gently position any clustered flakes with a dotting tool, then cure and finish with a glossy top coat.
- Variations: Use a matte top coat to tone down the sparkle into a sophisticated, understated forest floor finish.
10. Deep Mahogany Tortured Gold Luxurious and dark, this style uses a rich, reddish-brown mahogany base slashed through with jagged, hammered gold leafing for an antique, heirloom feel.
- How to Make It: Paint nails a deep, dark reddish-brown mahogany. Apply pieces of gold transfer foil or delicate gold leaf flakes onto a tacky layer in an organic, jagged streak down the side of the nail. Seal with a thick layer of top coat to ensure the foil is completely encapsulated.
- Variations: Use silver leaf instead of gold for a cooler, more modern industrial contrast against the warm mahogany.
11. Muddy Taupe Negative Space A modern, architectural approach to earth tones, utilizing a dark, muddy taupe shade framing bare, natural nail cutouts in geometric block patterns.
- How to Make It: Apply a striping tape stencil to bare nails to create geometric triangles or half-moon shapes at the base. Paint the exposed areas with a dark muddy taupe. Carefully peel off the tape while the polish is still slightly wet to ensure sharp lines, then cure and top coat.
- Variations: Use two different earth tones—one side dark brown, the other dark olive—separated by a thin negative space stripe down the middle.
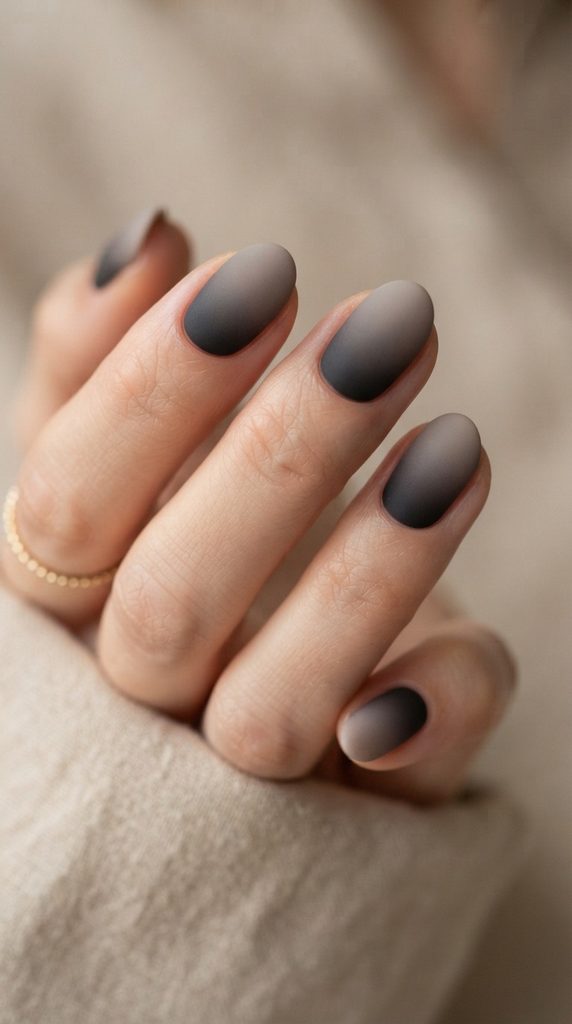
12. Charcoal Root Smoke A moody ombré that fades from a deep, smoked charcoal black at the cuticle into a soft, earthy mushroom grey at the tip, giving a subtle gothic-earth hybrid vibe.
- How to Make It: Sponge charcoal black polish onto the cuticle area, fading it downward toward the middle of the nail. Apply mushroom grey to the tip area, blending it into the center. Cure and repeat for seamless gradient blending.
- Variations: Add a dusting of fine magnetic silver glitter to the charcoal base to create a starry night soil effect.
13. Deep Olive Crocodile Skin A textured, exotic-meets-earthy design featuring a deep, dark olive green base with raised, glossy embossed scales that mimic reptilian skin hiding in the undergrowth.
- How to Make It: Paint nails a solid deep olive green and cure. Using a thick builder gel and a fine liner, draw interconnected cell lines across the nail to form scales. Cure, then apply a glossy top coat over only the raised lines to make them pop against a matte background.
- Variations: Keep the entire nail glossy for a slick, wet-look reptile aesthetic.
14. Peat Moss Speckled Egg Inspired by speckled natural bird eggs found in woodland nests, this design features a textured, muted dark taupe-green base peppered with tiny, random black ink splatters.
- How to Make It: Paint nails a soft peat moss taupe or greenish-brown. Dip a clean toothbrush or fan brush into diluted black acrylic paint, hold it over your hand, and flick the bristles to create a fine, natural speckle pattern across the nails. Seal with a matte top coat.
- Variations: Use white and black speckles together for a dynamic, granite-like speckled effect.


15. Deep Ochre Smoke Swirls Flowing and organic, this look pairs a deep, dark brownish-ochre base with delicate, wispy smoke swirls of black and cream weaving across the surface.
- How to Make It: Apply a dark ochre base and cure. Using a fine liner brush dipped in black and white polish mixed with clear top coat, draw soft, curving, translucent smoke lines that twist across the nail bed. Soften with a blending brush, then cure.
- Variations: Keep the smoke lines strictly monochrome black against a deep, solid ochre background for a cleaner look.
16. Charred Wood Grain Mimicking the ancient Japanese wood-preservation technique of Shou Sugi Ban, this intricate design features dark charcoal and black wood-grain lines over a warm, dark wood-brown base.
- How to Make It: Paint nails a warm medium-dark wood brown. Using a fine liner brush and black gel, draw long, wavy, concentric wood-grain lines that curve naturally from one side of the nail to the other. Cure and finish with a satin finish top coat.
- Variations: Add a hint of gold chrome powder along the peaks of the wood grain lines for a gilded natural effect.
17. Deep Bronze Aura Glow A mesmerizing, moody halo effect where a deep, dark chocolate brown outer ring fades inward into a glowing, warm bronze center, mimicking an earthy eclipse.
- How to Make It: Apply a chocolate brown base and cure. Using a small eyeshadow sponge applicator, dab a metallic bronze powder or lighter brown polish directly onto the center of the nail, diffusing the edges outward so the dark chocolate frames the finger. Cure and seal.
- Variations: Use a fiery copper pigment for the center aura to make the dark brown base look like glowing embers.
18. Raw Suede and Studs Combining a completely matte dark earth brown with tiny, metallic bronze micro-studs placed neatly at the base of each nail for an understated, utilitarian edge.
- How to Make It: Paint nails a deep earth brown and apply a flat matte top coat. While still tacky or using a tiny dot of nail glue, place one flat metallic bronze or gold micro-bead right at the cuticle center. Press down firmly and seal around the edges with top coat to secure.
- Variations: Create a line of three micro-studs running vertically up the center of an accent nail.
19. Deep Rooted Marble A sophisticated, swirling marble effect utilizing deep soil browns, charcoal blacks, and milky creams blended together into a luxurious, organic stone pattern.
- How to Make It: Apply a white or cream base. While wet, drop small dots of dark brown and black polish onto the surface. Using a fine needle or detailing brush, gently swirl the colors together into organic veins. Cure once satisfied and finish with a high-shine top coat.
- Variations: Use a matte top coat to give the marble a soft, unpolished river stone texture.
20. Twilight Soil Cat-Eye A multidimensional design that captures the magic of twilight hitting the damp ground, featuring a deep, dark brown-black base with a shifting, celestial magnetic streak of warm bronze light.
- How to Make It: Apply a dark brown base. Layer a magnetic bronze cat-eye gel over top. Hold a horseshoe magnet diagonally across the nail to pull the magnetic particles into a sharp, glowing slash of light that resembles a ray of sunlight piercing dark soil. Cure and top coat.
- Variations: Use a multi-chrome magnetic gel that shifts from bronze to green as your hand moves in the light.
Tips and Essential Techniques for Success
- Nail Prep is Everything: Dark and earthy colors are utterly unforgiving. Any imperfections, rough cuticles, or uneven filing will show immediately. Always push back cuticles cleanly and use a buffer to create a smooth surface.
- Mastering Short Nails: Keep your sidewalls clean and straight. Painting dark colors all the way to the absolute edge of the nail can sometimes make short nails look stubby; leave a microscopic hair-width gap of bare nail or cuticle space to create an elongated, professional optical illusion.
- The Importance of the Cap: Because dark colors chip visibly at the free edge, always cap your tips by running your brush horizontally along the very edge of the nail during every single layer (base, color, and top coat).
More ideas to come in future addition


